User Guide
Are you a hall administrator in-charge of managing residents in NUS? Do you have to fumble through multiple different excel sheets just to look for a resident’s information? Are you worried residents might be subject to the dangers of the pandemic? Well look no further as SafeFor(H)All is the application you need!
SafeFor(H)All is a desktop app for hall admins to keep track of hall residents’ information to keep hall residents safe during the COVID-19 pandemic via a Command Line Interface (CLI) while still having the benefits of a Graphical User Interface (GUI). If you can type fast, SafeFor(H)All can get your hall management tasks done faster than traditional GUI apps.
- Quick start
- App Interface
- Legend
-
Features
- Command Format
-
For Residents
- Adding a resident’s information :
add - Viewing residents information :
view - Listing residents by fet/collection deadlines :
deadline - Searching by resident information:
find - Editing a resident :
edit - Deleting a resident :
delete - Tracing close contacts :
trace - Sorting residents :
sort - Importing resident data :
import - Exporting residents’ emails :
export
- Adding a resident’s information :
- For Events
- Commons
- Prefix summary
- Command summary
- 1. Introduction
-
2. Quick start
-
Features
- Viewing help :
help - Adding a patron:
add - Listing all patrons :
list - Editing a patron :
edit - Finding a patron by name:
find - Deleting a patron :
delete - Adding a book:
add - Listing all books :
list - Editing a book :
edit - Deleting a book :
delete - Borrowing a book :
borrow - Returning a book :
return - Requesting a book :
request - Clearing all entries :
clear - Exiting the program :
exit - Saving the data
- Editing the data file
- Archiving data files
[coming in v2.0]
- Viewing help :
- FAQ
- Command summary
-
Features
Quick start
-
Ensure you have Java
11or above installed in your Computer. -
Download the latest
safeforhall.jarfrom here. -
Copy the file to the folder you want to use as the home folder for your SafeFor(H)All Application.
-
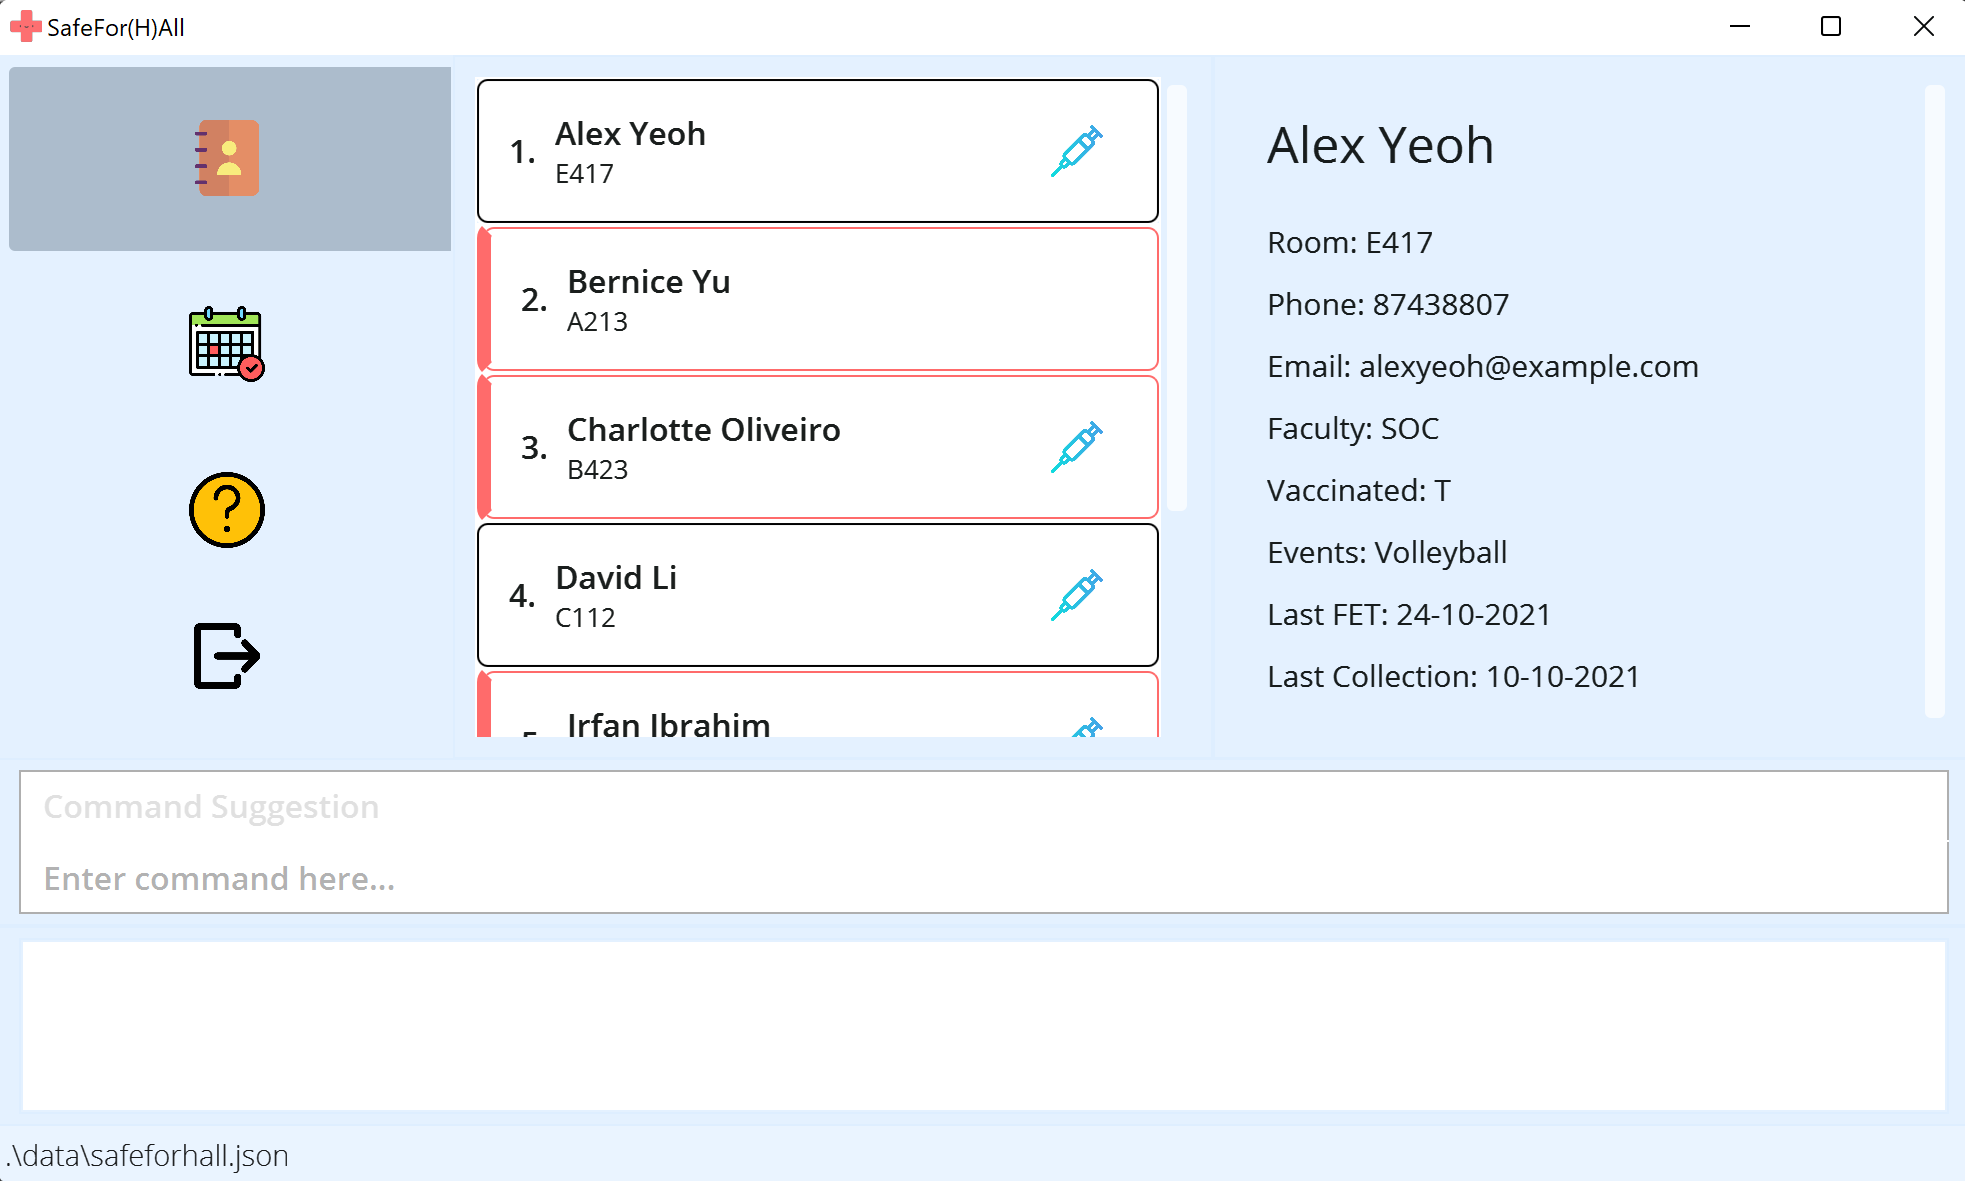
Double-click the file to start the app. The GUI similar to the below should appear in a few seconds.
-
Type the command in the command box and press Enter to execute it. e.g. typing
helpand pressing Enter will open the help window.
Some example commands you can try:-
view: Lists all residents. -
addn/John Doe r/A100 e/john@gmail.com p/12345678 v/t f/SoC: Adds a resident namedJohn Doewith the given information to the application. -
delete3: Deletes the 3rd resident shown in the current list. -
exit: Exits the app.
-
-
Refer to the Features below for details of each command.
App Interface
Refer to the diagram below to understand how our app, SafeFor(H)All looks like.
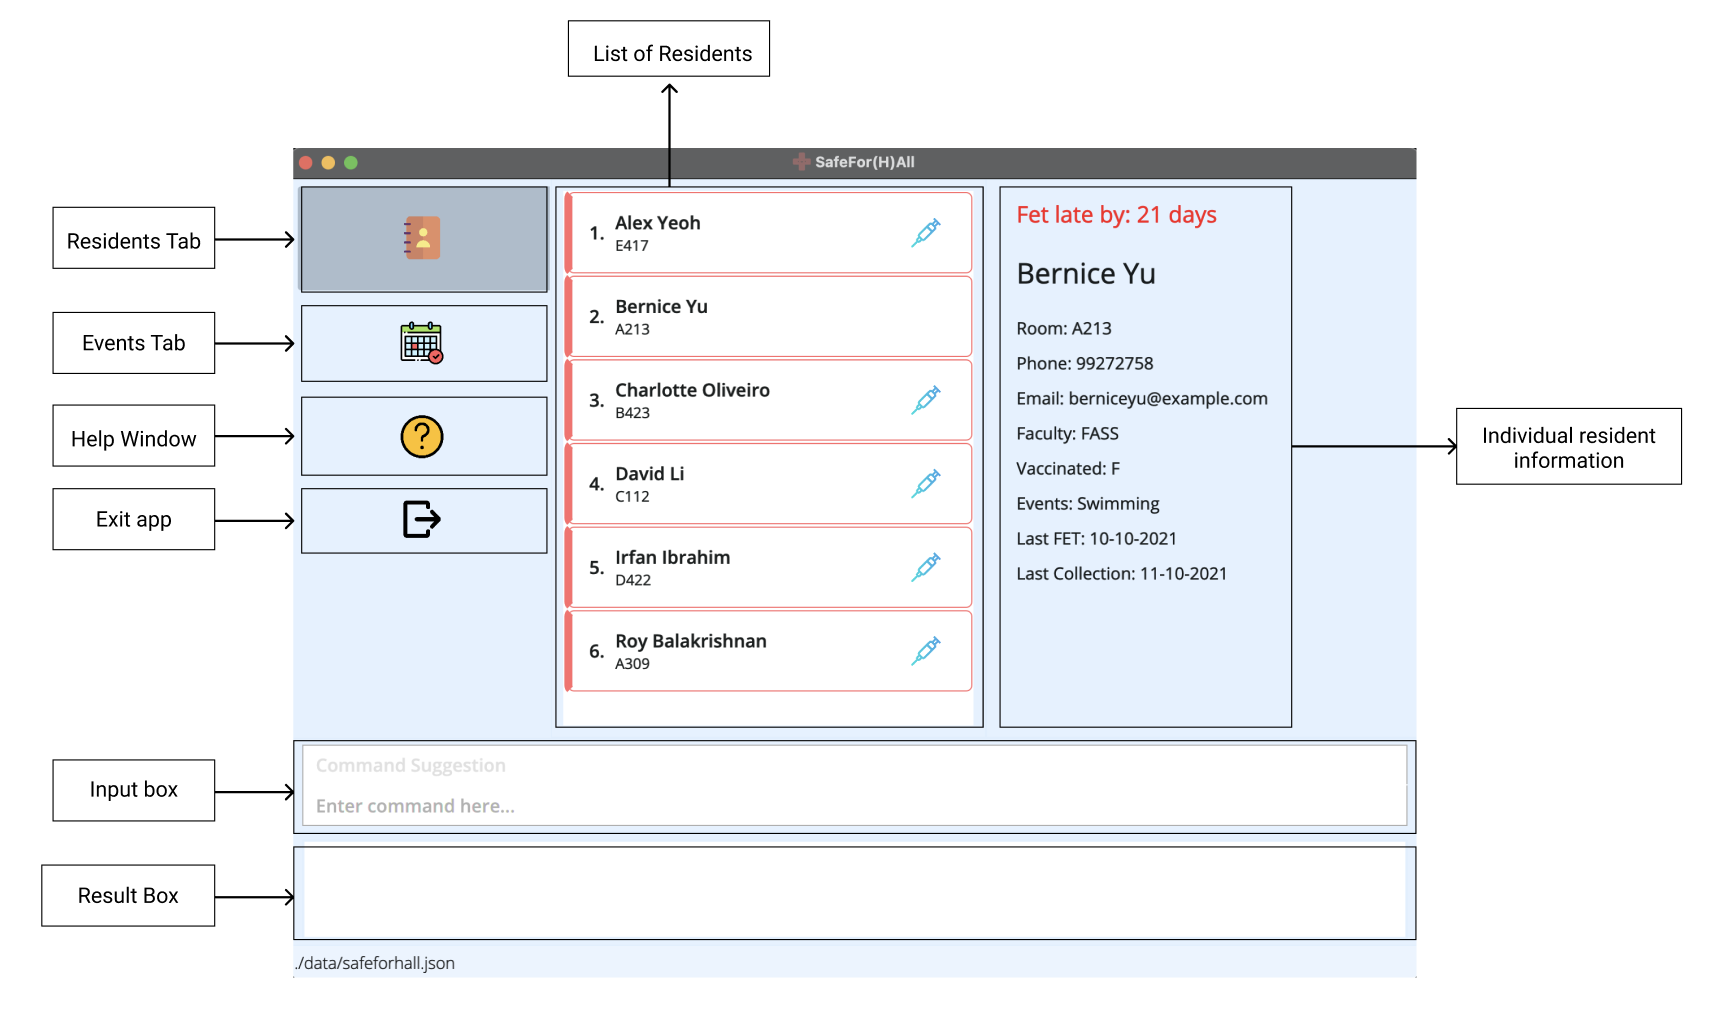
| Section | Explanation |
|---|---|
| Residents Tab | When selected, it allows you to view the list of residents and their associated information |
| Events Tab | When selected, it allows you to view the list of events and their associated information |
| Help Window | When clicked, a pop-up will appear containing a list of commands and how to use them |
| Exit app | Closes the app |
| Input Box | Input your command here. The command suggestion box will suggest parameters upon typing |
| Result Box | The result of the inputted command will be displayed here |
| List of Residents | Displays the list of residents in the app. You can view details about a specific resident by clicking on it, or by using the view command |
| Individual resident information | In the example shown, the resident has a late FET test which is 21 days overdue. |
Legend
Below are some formats used to convey different kinds of information:
Information boxes
Tips
Warnings
Highlights
These are used to highlight parameters, field values, commands, file names or any user inputs.
Features
Command Format
Format: command_word Prefix/PARAMETER
-
command_wordis a word at the start of the command to specify the action to be done.
e.g. inadd n/NAME,addis the command word. -
PARAMETERare word(s) inUPPER_CASEto be supplied by the user.
e.g. inadd n/NAME,NAMEis a parameter which can be used asadd n/John Doe -
Prefixare letter(s) beforePARAMETERto denote the information supplied as parameter.
e.g. inadd n/NAME,n/is a prefix to indicate that NAME is being supplied.
![]() Notes about the command format:
Notes about the command format:
-
Items in square brackets are optional.
e.gadd n/NAME [fd/LAST_FET_DATE]can be used asadd n/Johnor asadd n/John fd/09-09-2021. -
An ellipsis (…) implies multiple of that parameter can be provided.
e.gedit INDEX...can be used asedit 1or asedit 1 2 3 5 8. -
Parameters can be in any order.
e.g. if the command specifiesn/NAME f/FACULTY,f/FACULTY n/NAMEis also acceptable. -
If a parameter is expected only once in the command but you specified it multiple times, only the last occurrence of the parameter will be taken.
e.g. if you specifyv/t v/fonlyv/fwill be taken. -
Extraneous parameters for commands that do not take in parameters (such as
help,exit,view) will be ignored.
e.g. if the command specifieshelp 123, it will be interpreted ashelp. -
Date parameters can be of formats:
dd-mm-yyyy,dd.mm.yyyyordd/mm/yyyy -
Time parameter is of format:
hhmm
For Residents
These commands will function as specified when run under the Resident tab.
Adding a resident’s information : add
Adds a resident and their information to the application.
Format: add n/NAME p/PHONE_NUMBER e/EMAIL r/ROOM v/VACCINATION_STATUS f/FACULTY [fd/LAST_FET_DATE] [cd/LAST_COLLECTION_DATE]
| Parameter | Constraints |
|---|---|
| NAME | Unique, only containing alphabetical characters and spaces |
| PHONE | At least 6 digits long |
| ROOM | Unique, made up of block + level + number block is an alphabetical character from A to E level is a digit from 1 to 4 number is two digits from 00 to 29 e.g. A100
|
| The local-part should only contain alphanumeric characters and these special characters, excluding the parentheses, (+_.-). The local-part may not start or end with any special characters. This is followed by a ‘@’ and then a domain name. The domain name is made up of domain labels separated by periods. The domain name must: - end with a domain label at least 2 characters long - have each domain label start and end with alphanumeric characters - have each domain label consist of alphanumeric characters, separated only by hyphens, if any. |
|
| VACCINATION_STATUS |
T or F (case insensitive) |
| FACULTY | Single alphabetical word |
|
LAST_FET_DATE LAST_COLLECTION_DATE |
Should be of dd-mm-yyyy, dd.mm.yyyy or dd/mm/yyyy format |
![]() Note:
Note:
ROOM is currently modelled after an existing hall in the National University of Singapore.
LAST_FET_DATE and LAST_COLLECTION_DATE are optional parameters.
Here’s a step by step guide:
-
Type the
addcommand and the rest of the parameters with help from the command suggestion.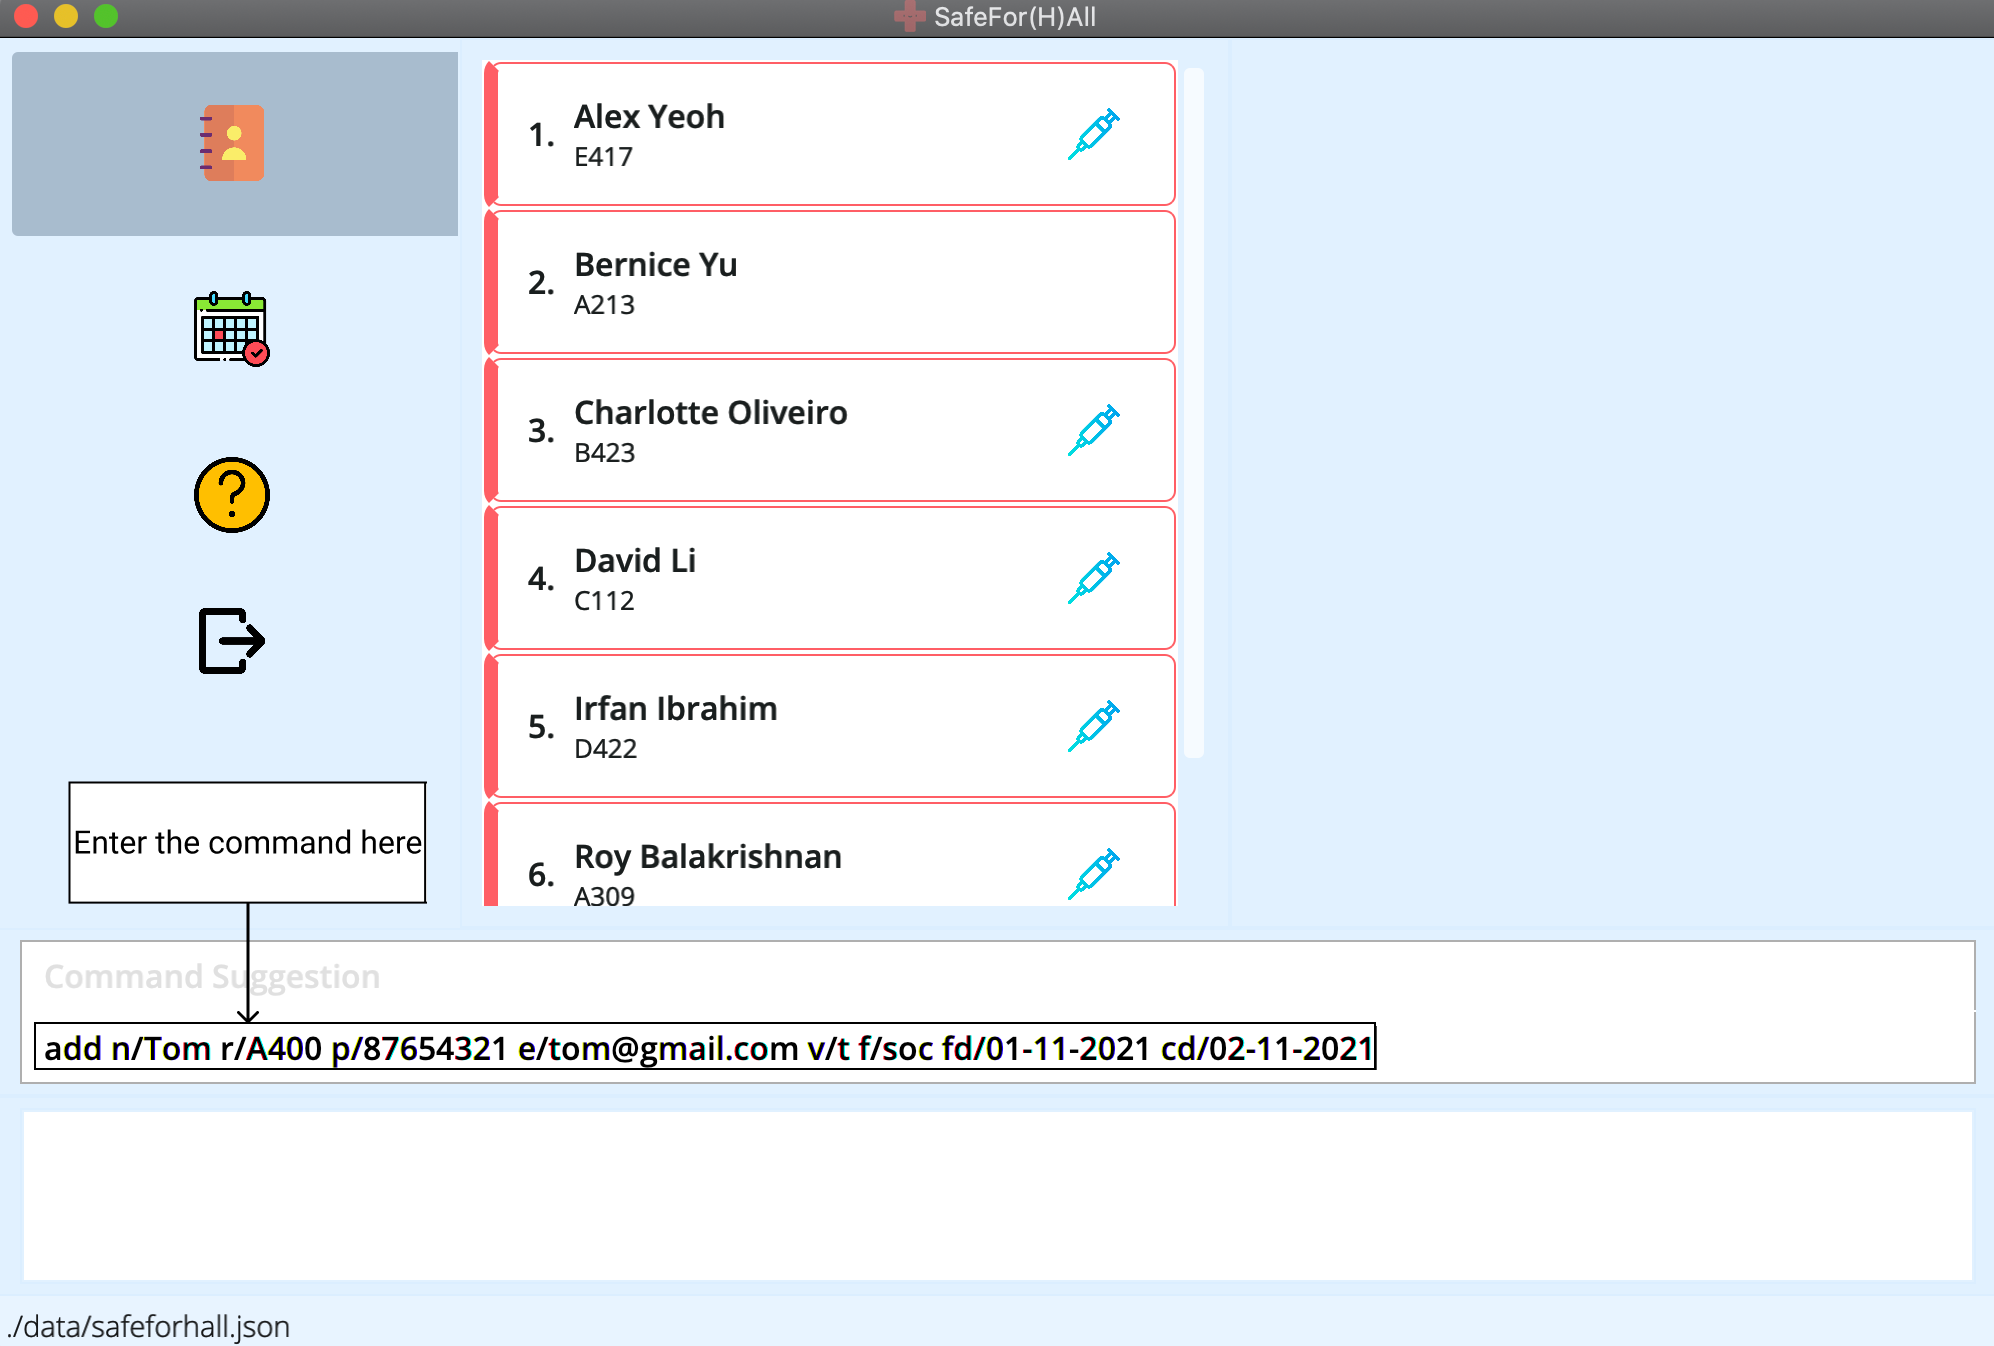
-
After execution, the person list will now show the new person.
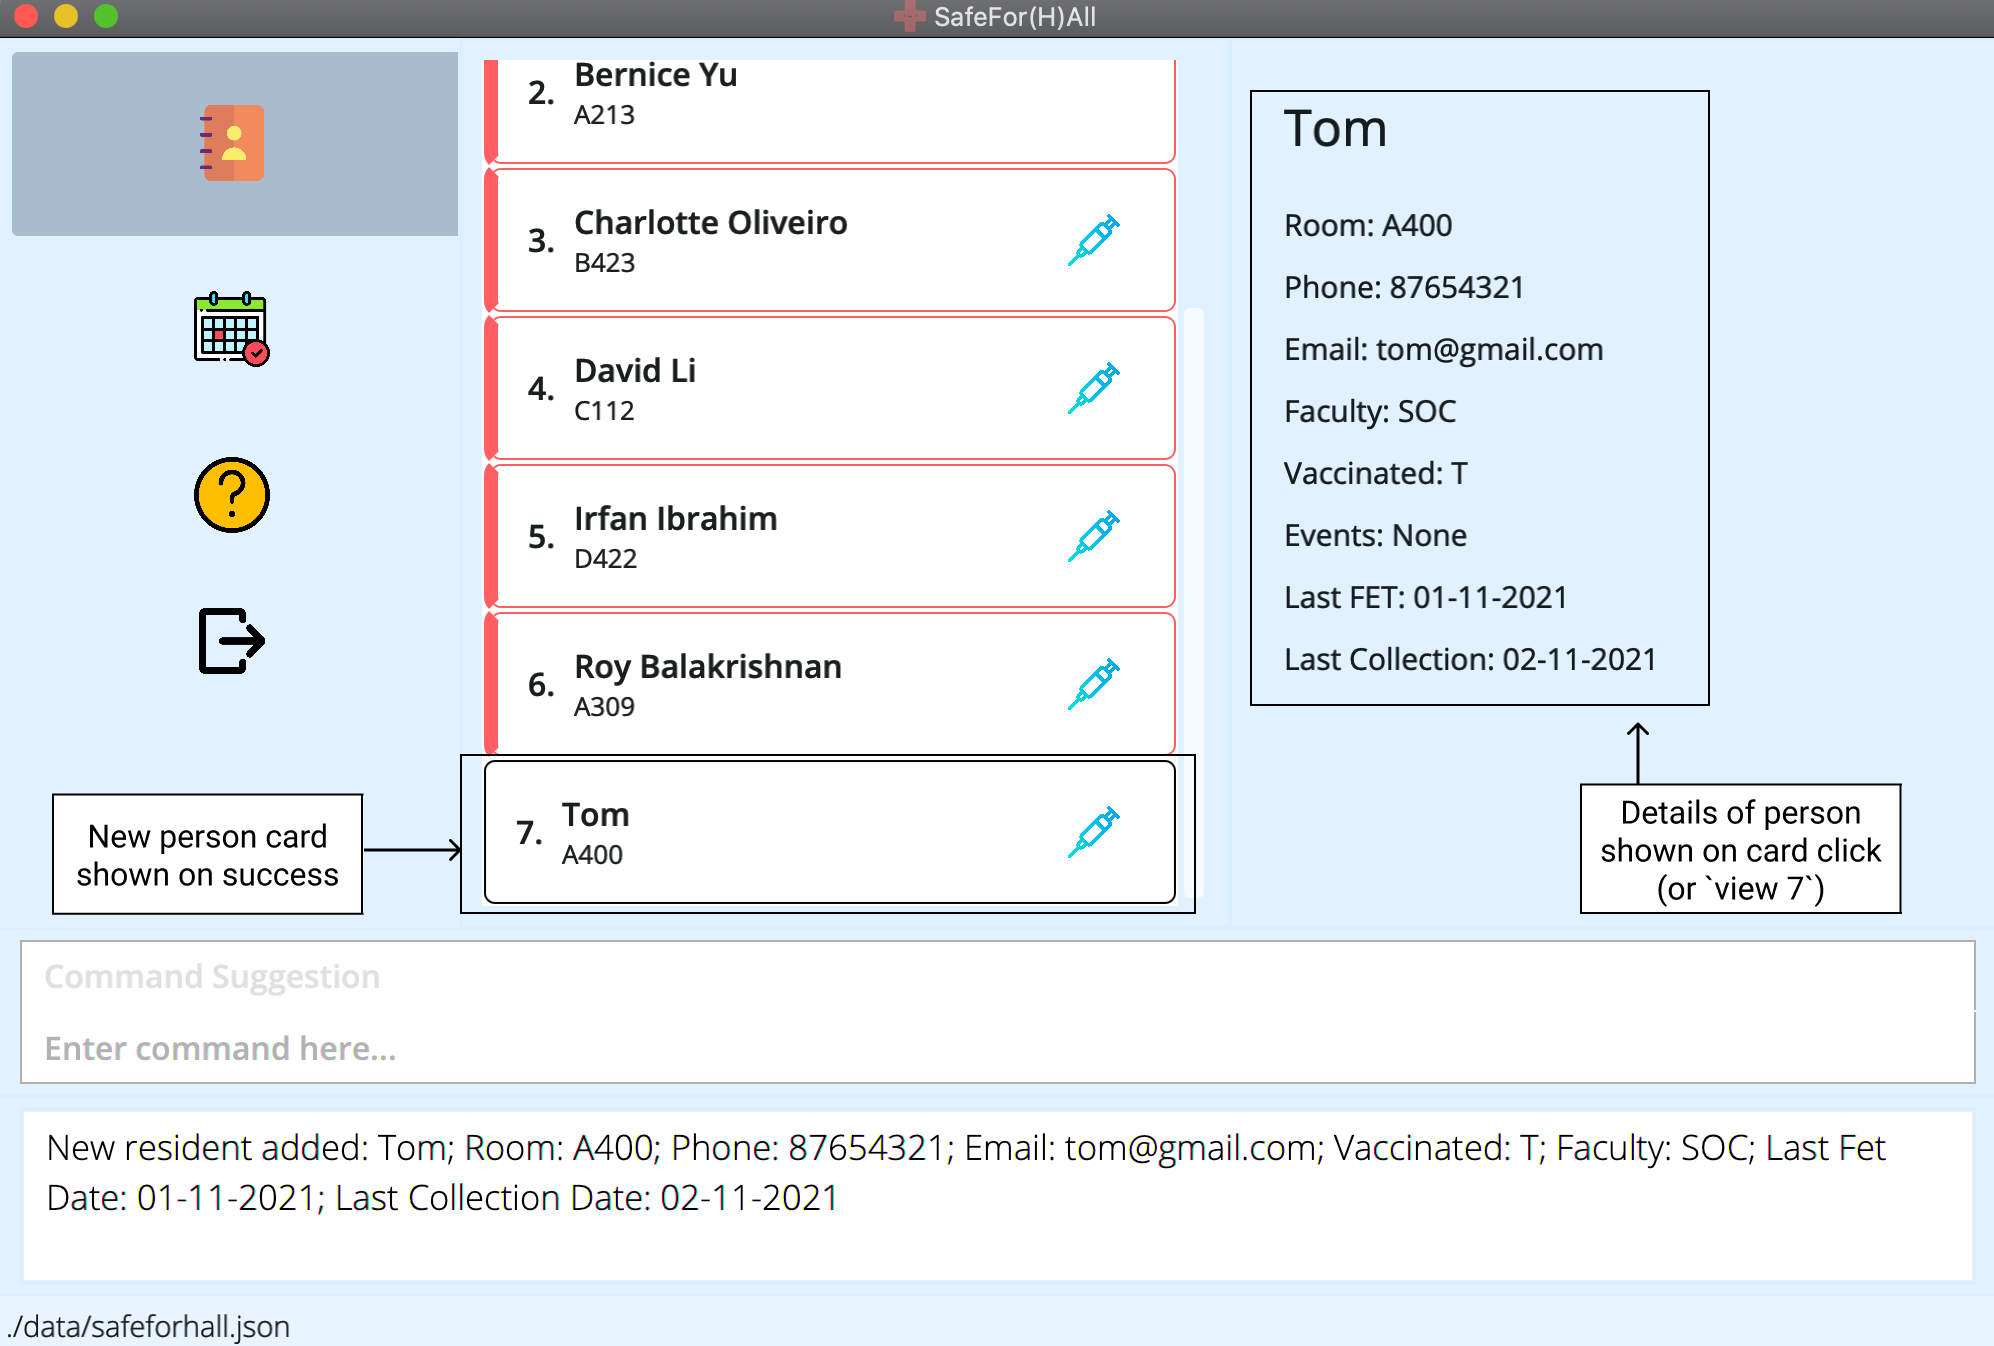
Examples:
add n/John Doe p/98765432 e/johnd@example.com r/A100 v/t f/SoCadd n/Betsy Crowe e/betsyc@example.com v/F r/B400 p/1234567 f/FASS fd/20-10-2021 cd/23-10-2021
Viewing residents information : view
Shows a numbered list of all the residents in the address book.
The index of the resident is the corresponding number in the list
shown when view (without the [INDEX] parameter) is called.
Format: view [INDEX]
- For an index i, 1 ≤ i ≤ n, where n is the number of residents in the address book
Examples:
-
viewshows a list of all the residents -
view 30shows the details of the resident at index 30
Listing residents by fet/collection deadlines : deadline
Lists residents whose ART collection or FET tests are either:
- due before a given date,
d1, by using thelate keywordsor - due within the range of two given dates,
d1andd2, by using thenormal keywords.
![]() Note:
Note:
- There is a one week deadline for the test kit collection and fet test, therefore due date refers to one week after the last recorded date
| Differences | Normal Keyword | Late Keyword |
|---|---|---|
| Format | deadline k/KEYWORD d1/DATE1 d2/DATE2 |
deadline k/LATE_KEYWORD d1/DATE1 |
| Keyword |
f or c
|
lf or lc
|
| Input Date | Both DATE1 and DATE2 have to be inputted |
Only DATE1 should be inputted |
| Command Example | deadline k/f d1/10-10-2021 d2/12-10-2021 |
deadline k/lf d1/11-10-2021 |
| Usage | List residents whose deadline lie within the range of two given dates, inclusive | List residents whose deadline is due before a given date |
| Usage Example | A resident’s fet or collection is due one week after their last fet date or last collection date. For example, if a resident’s last fet date is on a friday, 15-10-2021, then the resident’s fet deadline is on the following friday which is 22-10-2021
|
The number of days a resident is considered late is calculated from a day after their deadline to the current date, both inclusive.For example, if a resident’s last fet date is 15-10-2021, then the fet deadline will be 22-10-2021, if the current date is 25-10-2021, then the number of days the resident is late for fet is 3 days. |
| Note | The given DATE2 must be a date later than the given DATE1DATE1 is the start date and DATE2 is the last date inclusive |
Anyone whose fet and collection is due before but not on DATE1 is outputted |
Here’s a step-by-step guide for Normal Keyword:
-
Type the
deadlinecommand with thenormal keyword,ffor fet orcfor collection,d1, the start date andd2, the end date.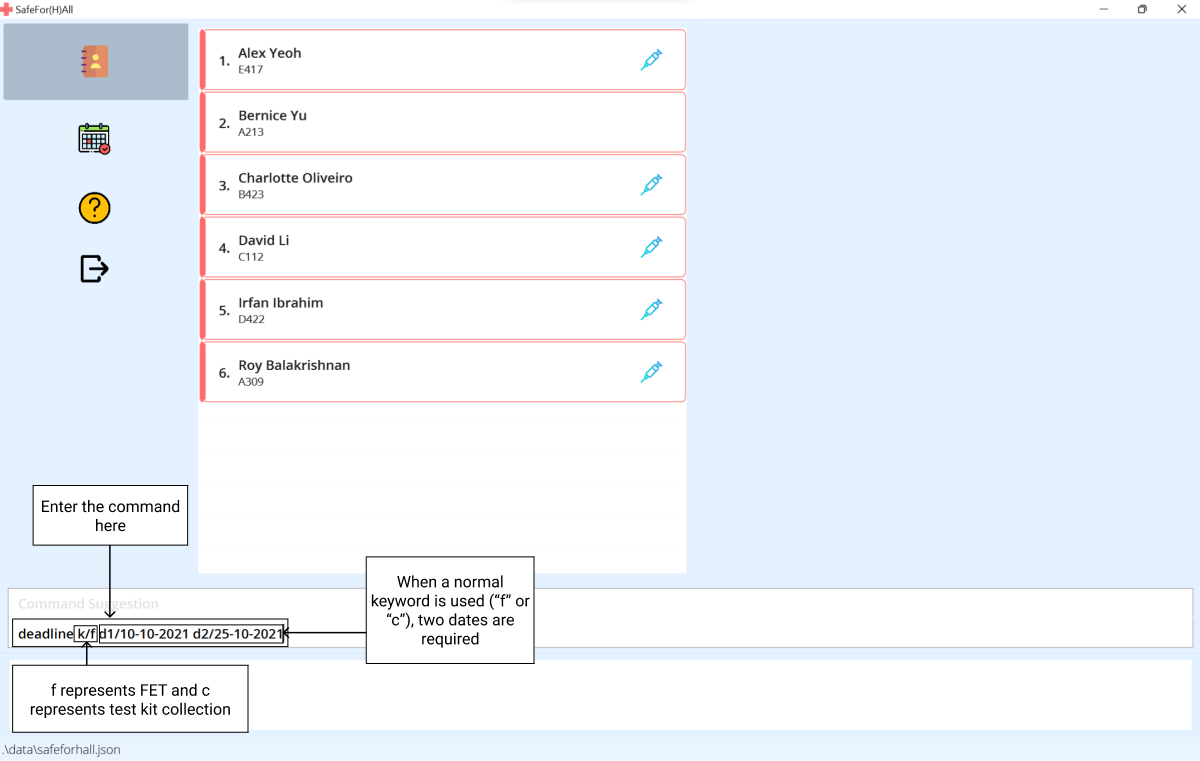
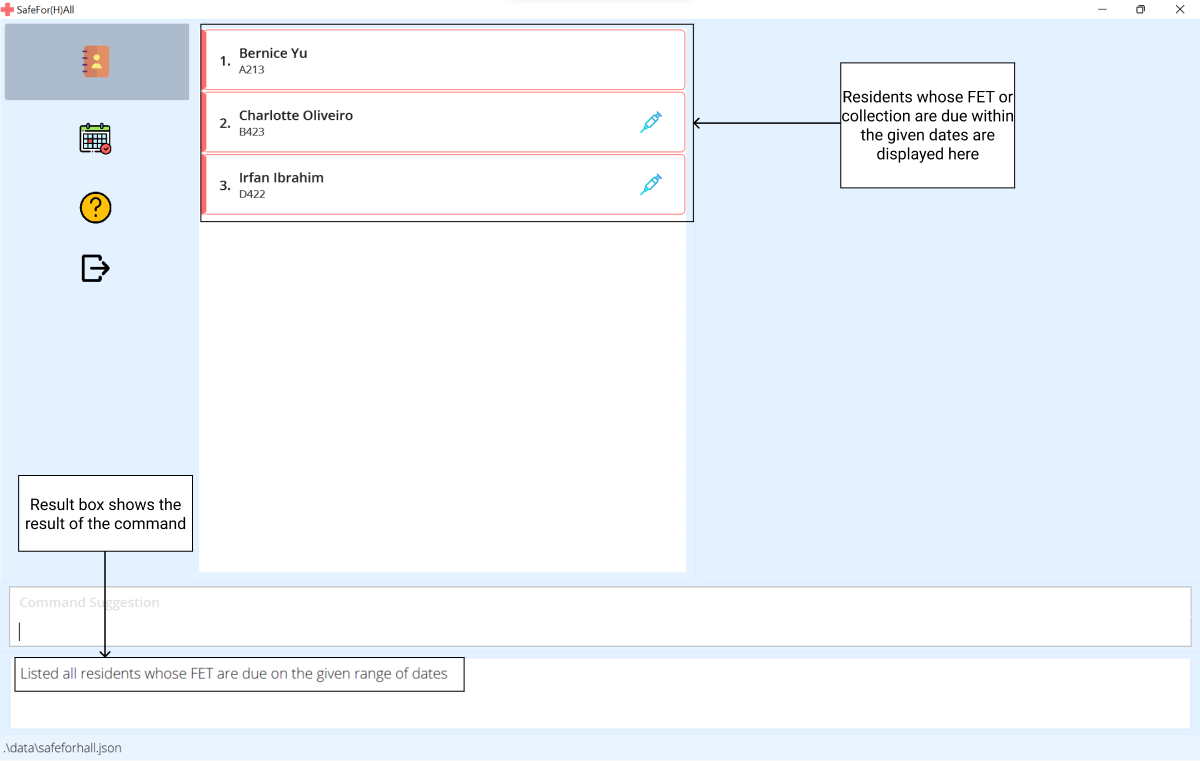
-
The event list will now show the filtered list of residents.
Here’s a step-by-step guide for Late Keyword:
-
Type the
deadlinecommand with thelate keyword,lffor late fet orlcfor late collection,d1, the end date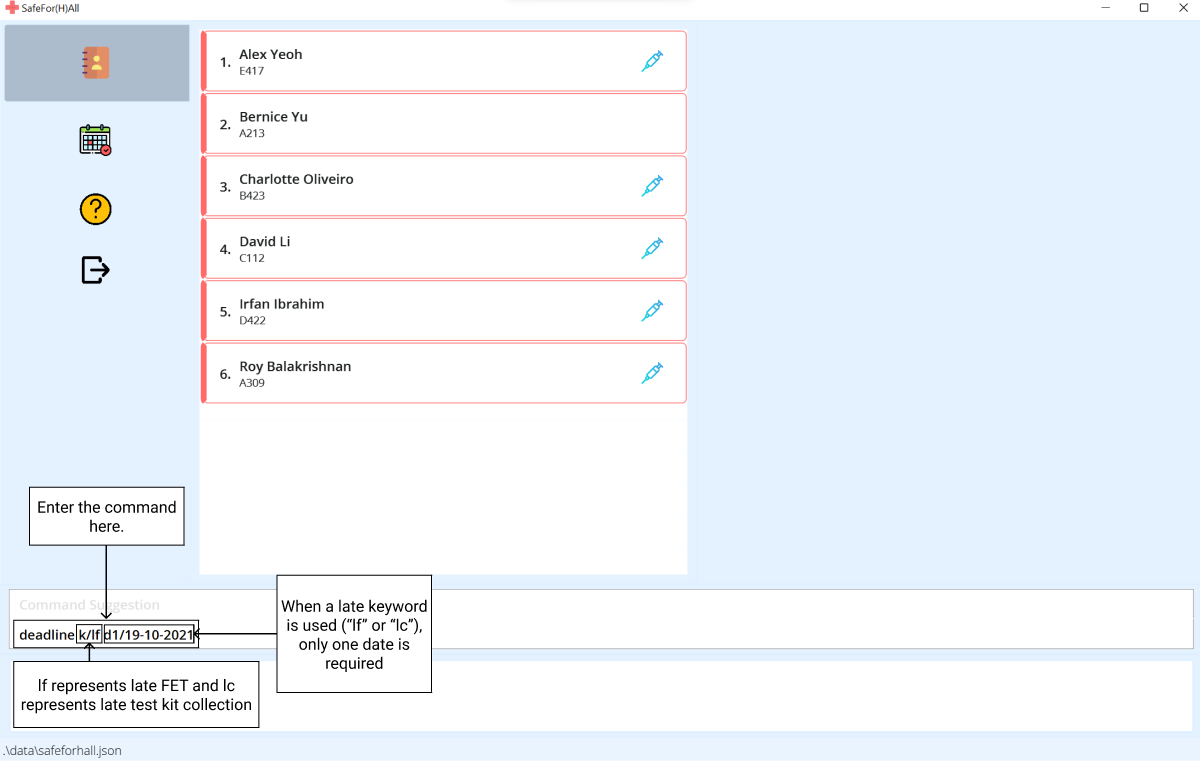
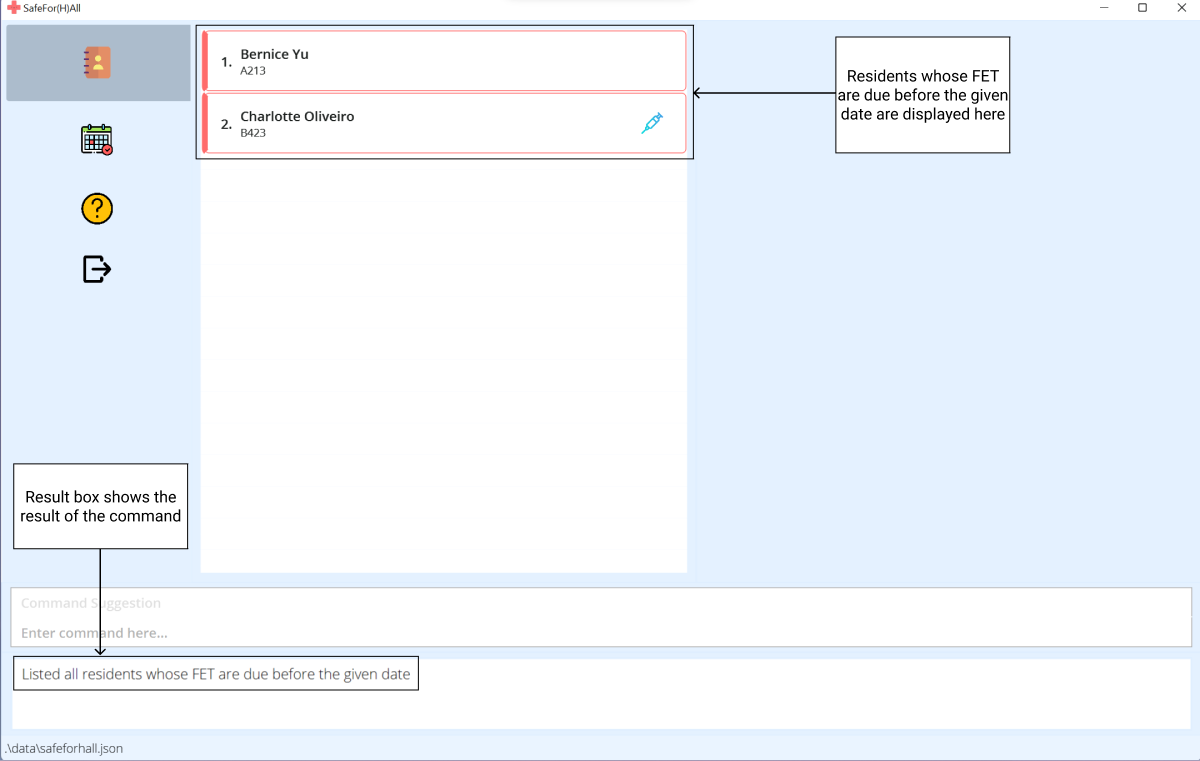
-
The event list will now show the filtered list of residents.
Examples:
-
deadline k/f d1/10-10-2021 d2/12-10-2021retrieves a list of residents whoseFETis due between10 Oct 2021and12 Oct 2021, inclusive -
deadline k/f d1/15-10-2021 d2/20-10-2021retrieves a list of residents whoseTest Kit Collectionis due some day between15 Oct 2021and20 Oct 2021, inclusive -
deadline k/lf d1/11-10-2021retrieves a list of residents whoseFETis due before11 Oct 2021 -
deadline k/lc d1/12-10-2021retrieves a list of residents whoseTest Kit Collectionis due before12 Oct 2021
Searching by resident information: find
Shows a list of residents that match the provided keywords for different available parameters. Allowed flags include; n/, r/, e/, p/, f/ and v/.
Format: find [PREFIX/KEYWORD]...
| Prefix | Field | Restrictions |
|---|---|---|
n |
Name | - It is case-insensitive. e.g hans will match Hans, True will match true - The order of the keywords provided for the name does not matter. e.g Hans Bo will match Bo Hans - Only full words will be matched. e.g Han will not match Hans - Residents matching at least one keyword for the name will be returned (i.e. OR search). e.g Hans Bo will return Hans Gruber, Bo Yang
|
r |
Room | - It is case-insensitive - A block can be used as a search. e.g r/A - A level can be used as a search. e.g r/2 - A block-level can be used as a search. e.g r/A2 - A full valid room can be used as a search. e.g r/A210
|
e, p, f, v
|
Email, Phone, Faculty, VaccStatus |
Subject to the same validity conditions as in the Add Command |
![]() Note:
Note:
- Prefixes for
LAST_FET_DATEandLAST_COLLECTION_DATEare not used. Refer to Deadline Command on how to make use of these fields. - Any provided preamble to the prefixes will be ignored
Examples:
-
find n/JohnreturnsjohnandJohn Doe -
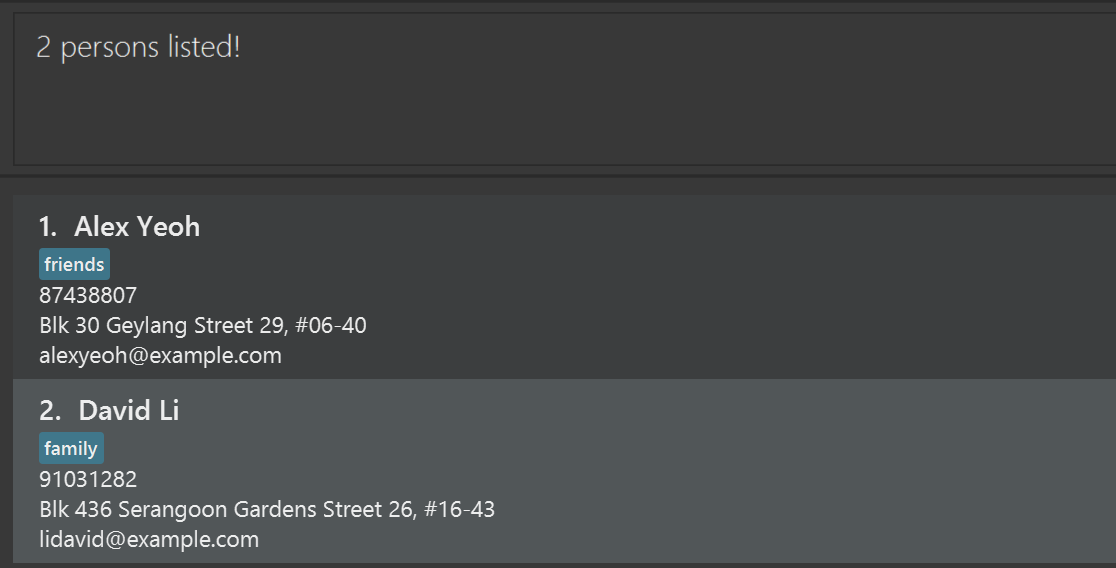
find n/alex david v/treturns vaccinated residents,Alex YeohandDavid Li -
find v/f f/socreturns un-vaccinated residents from SoC
Editing a resident : edit
Edits the details of existing residents in the address book.
Format: edit INDEX… [n/NAME] [r/ROOM] [p/PHONE] [e/EMAIL] [v/VACCINATION_STATUS] [f/FACULTY] [fd/LAST_FET_DATE] [cd/LAST_COLLECTION_DATE]
| Parameter | Constraints |
|---|---|
| NAME | Unique, only containing alphabetical characters and spaces |
| PHONE | At least 6 digits long |
| ROOM | Made up of block + level + number block is an alphabetical character from A to E level is a digit from 1 to 4 number is two digits from 00 to 29 e.g. A100
|
| The local-part should only contain alphanumeric characters and these special characters, excluding the parentheses, (+_.-). The local-part may not start or end with any special characters. This is followed by a ‘@’ and then a domain name. The domain name is made up of domain labels separated by periods. The domain name must: - end with a domain label at least 2 characters long - have each domain label start and end with alphanumeric characters - have each domain label consist of alphanumeric characters, separated only by hyphens, if any. |
|
| VACCINATION_STATUS |
T or F (case insensitive) |
| FACULTY | Single alphabetical word |
|
LAST_FET_DATE LAST_COLLECTION_DATE |
Should be of dd-mm-yyyy, dd.mm.yyyy or dd/mm/yyyy format |
- Edit the residents at the specified
INDEXES. - Each index refers to the index number shown in the displayed resident list.
- The indexes must be positive integers 1, 2, 3, …
- At least one of the optional fields must be provided.
- Existing values will be updated to the input values.
- Edit multiple residents in a single command by inputting multiple indexes, each separated by a space.
Example:
Let’s say that residents Alex Yeoh and Bernice Yu just updated you that they are now fully vaccinated, and have submitted their overdue FET on 5th Nov 2021.
You can easily update these details in a single edit command.
-
Navigate to the list of residents. Note that Alex Yeoh and Bernice Yu have indexes of 1 and 2 respectively in the current resident list. To update Alex and Bernice’s vaccination statuses and last FET dates, simply enter
edit 1 2 v/T fd/05-11-2021.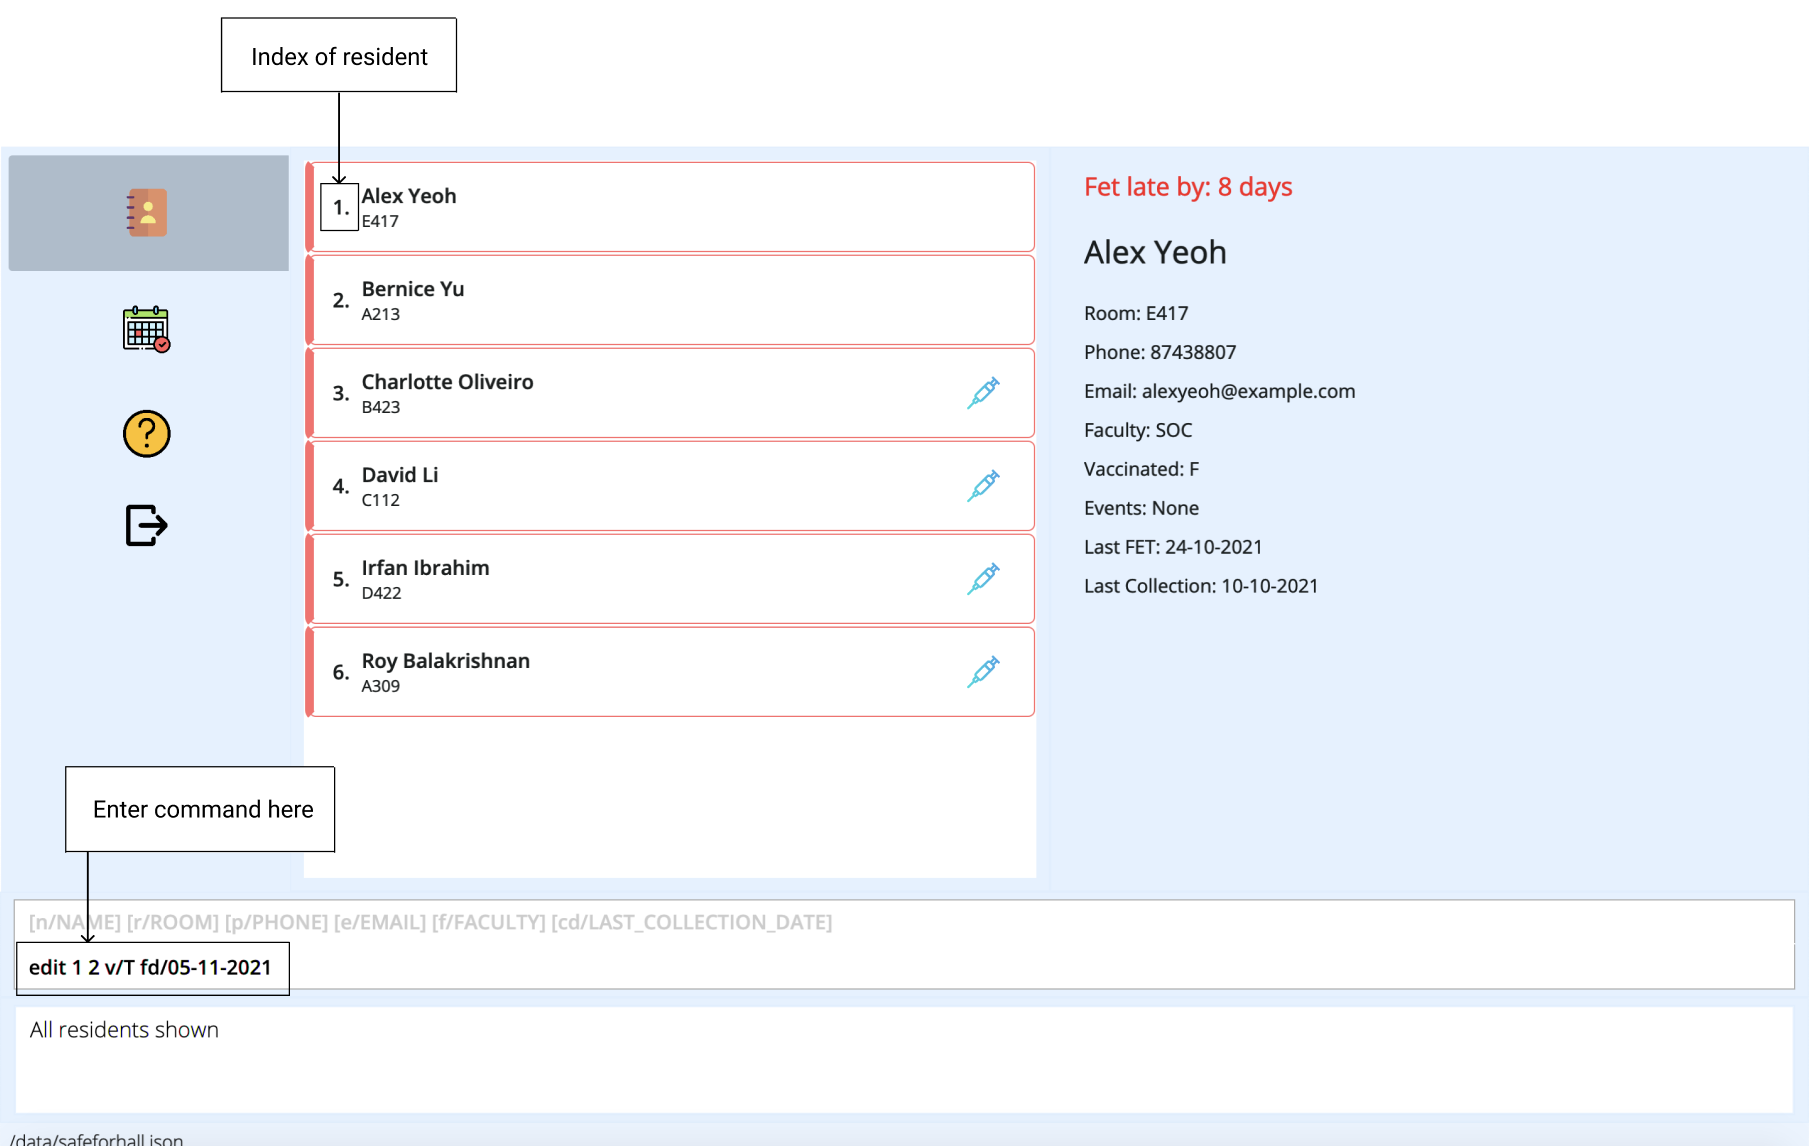
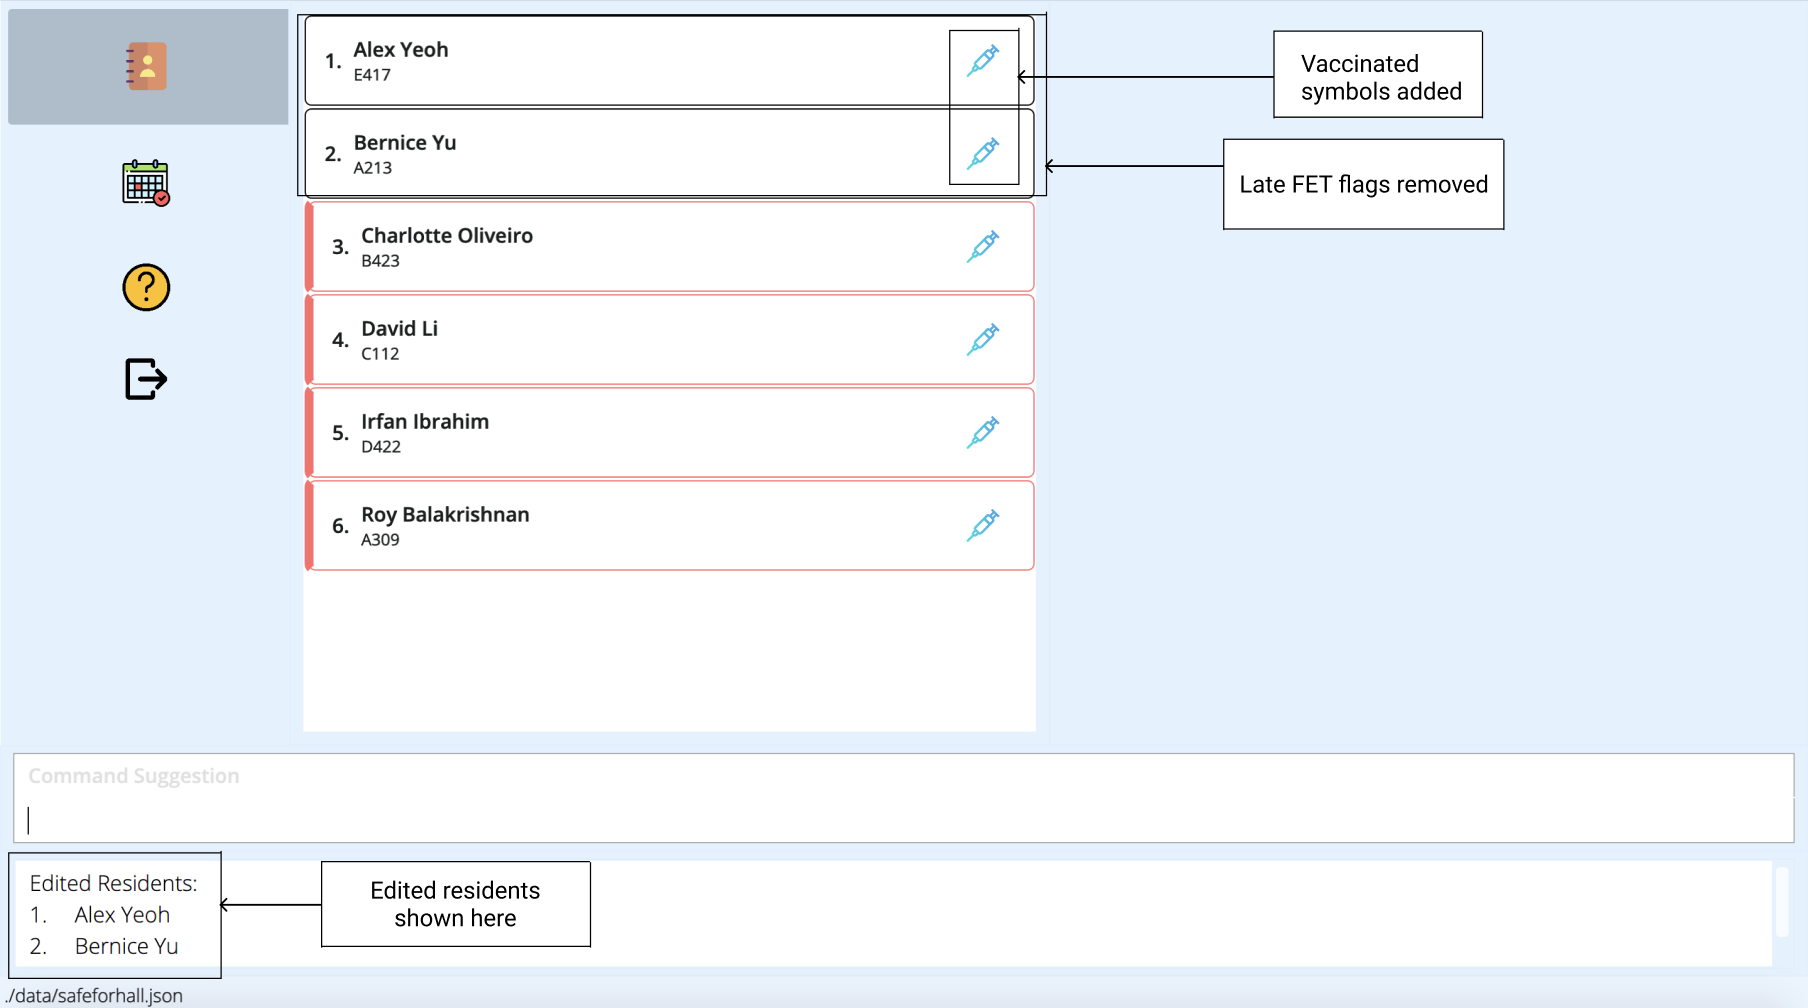
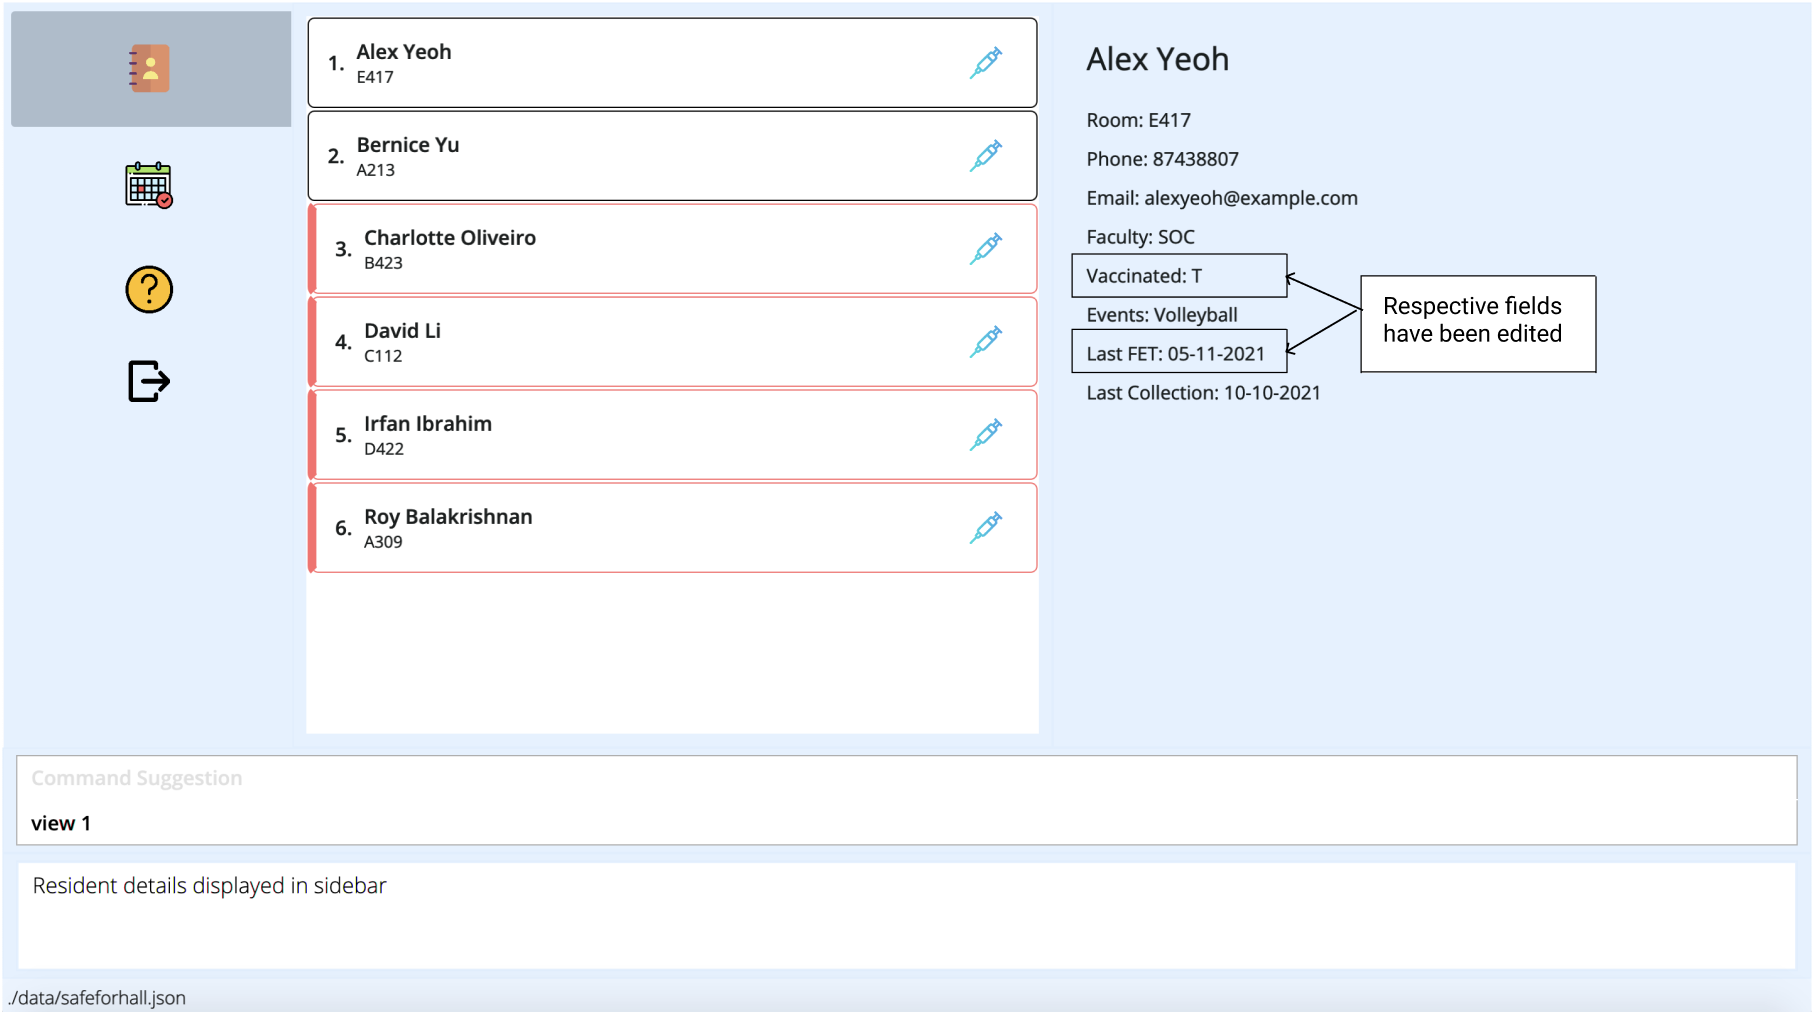
-
The result box will notify you of the edited residents. The resident list will be updated to contain the modified details. Note that in this case, Alex Yeoh and Bernice Yu no longer have outstanding FETs to submit, so the red flag around their name will be removed. There will also be a syringe symbol beside their names to show that they are vaccinated.
More Examples:
-
edit 1 e/johndoe@example.com r/A101Edits the email address and room number of the 1st resident to bejohndoe@example.comandA101respectively. -
edit 1 2 3 v/t fd/20-10-2021Sets the vaccination status of the 1st, 2nd, and 3rd resident as vaccinated, and sets their last FET dates to 20-10-2021.
Deleting a resident : delete
delete command cannot be undone! Do make sure that you have entered the command correctly before running it.
Deletes specified residents from the address book.
Format: delete INDEX…
- Delete the residents at the specified
INDEXES. - Each index refers to the index number shown in the displayed resident list.
- The indexes must be positive integers 1, 2, 3, …
- Delete multiple residents in a single command by inputting multiple indexes, each separated by a space.
Example:
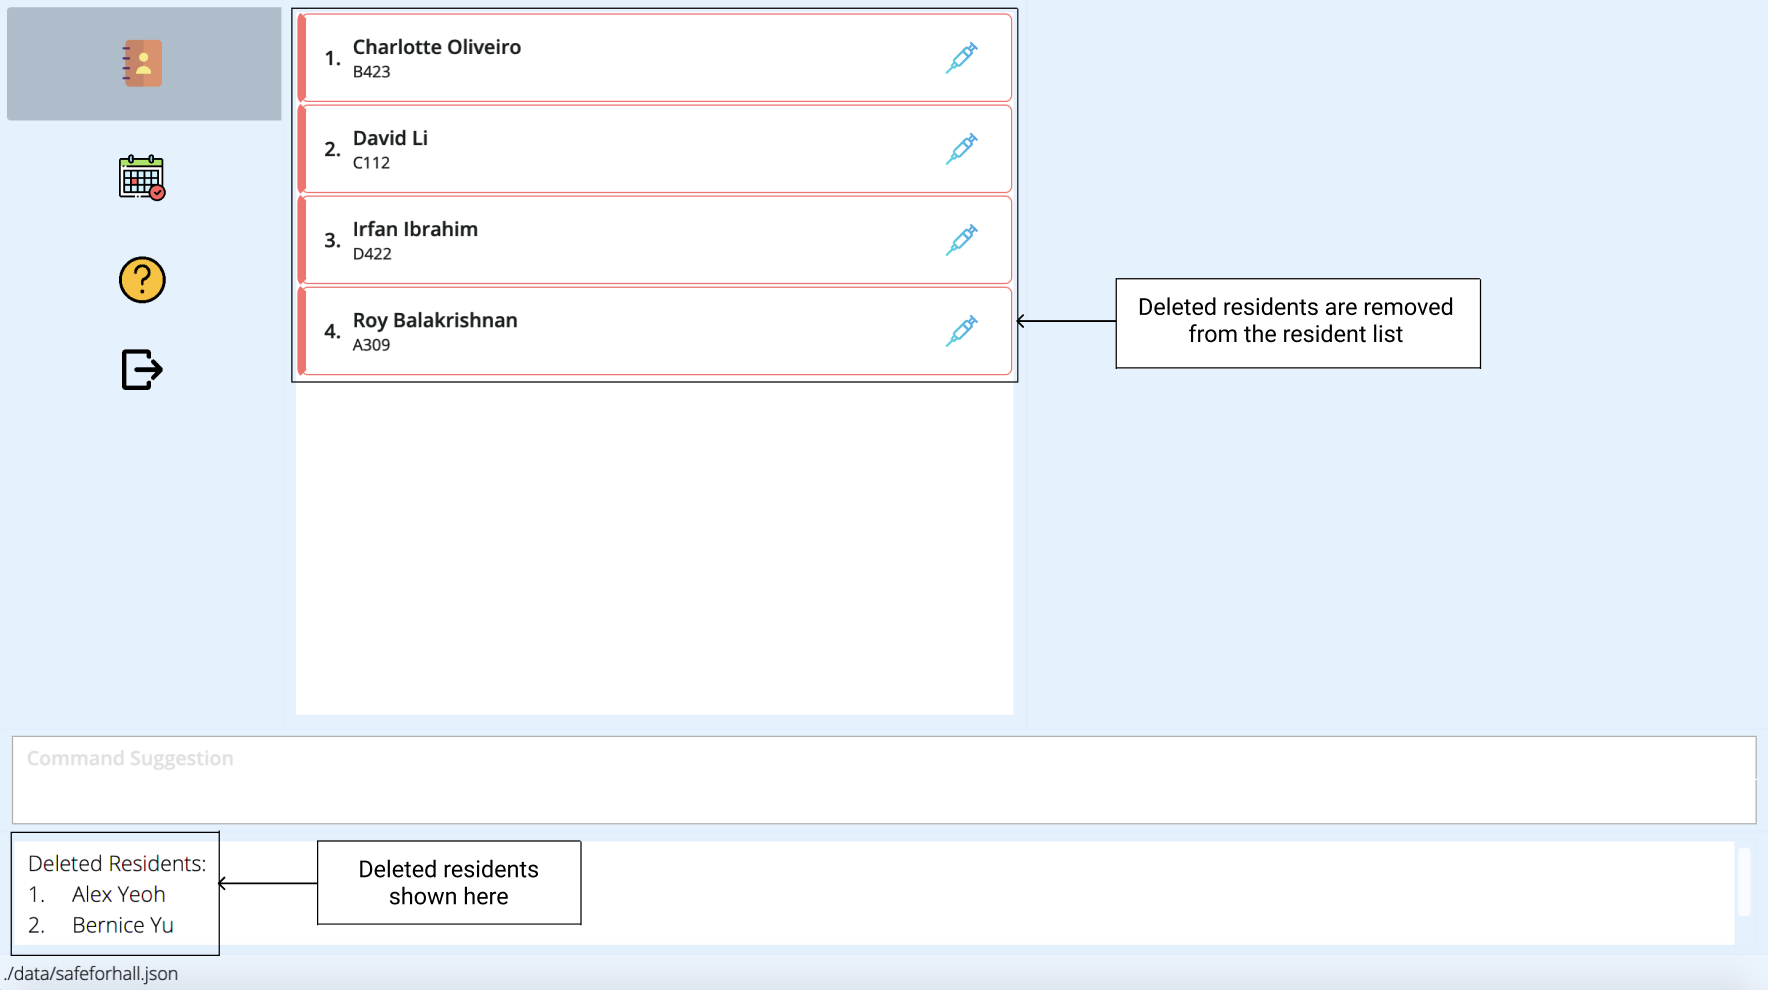
Suppose Alex Yeoh and Bernice Yu have recently moved out of hall. To keep the addressbook updated, you might want to remove them from the list of residents.
You can easily do this a single delete command.
-
Note that Alex Yeoh and Bernice Yu have indexes of 1 and 2 respectively in the current resident list. To remove them from the list of residents, simply enter
delete 1 2.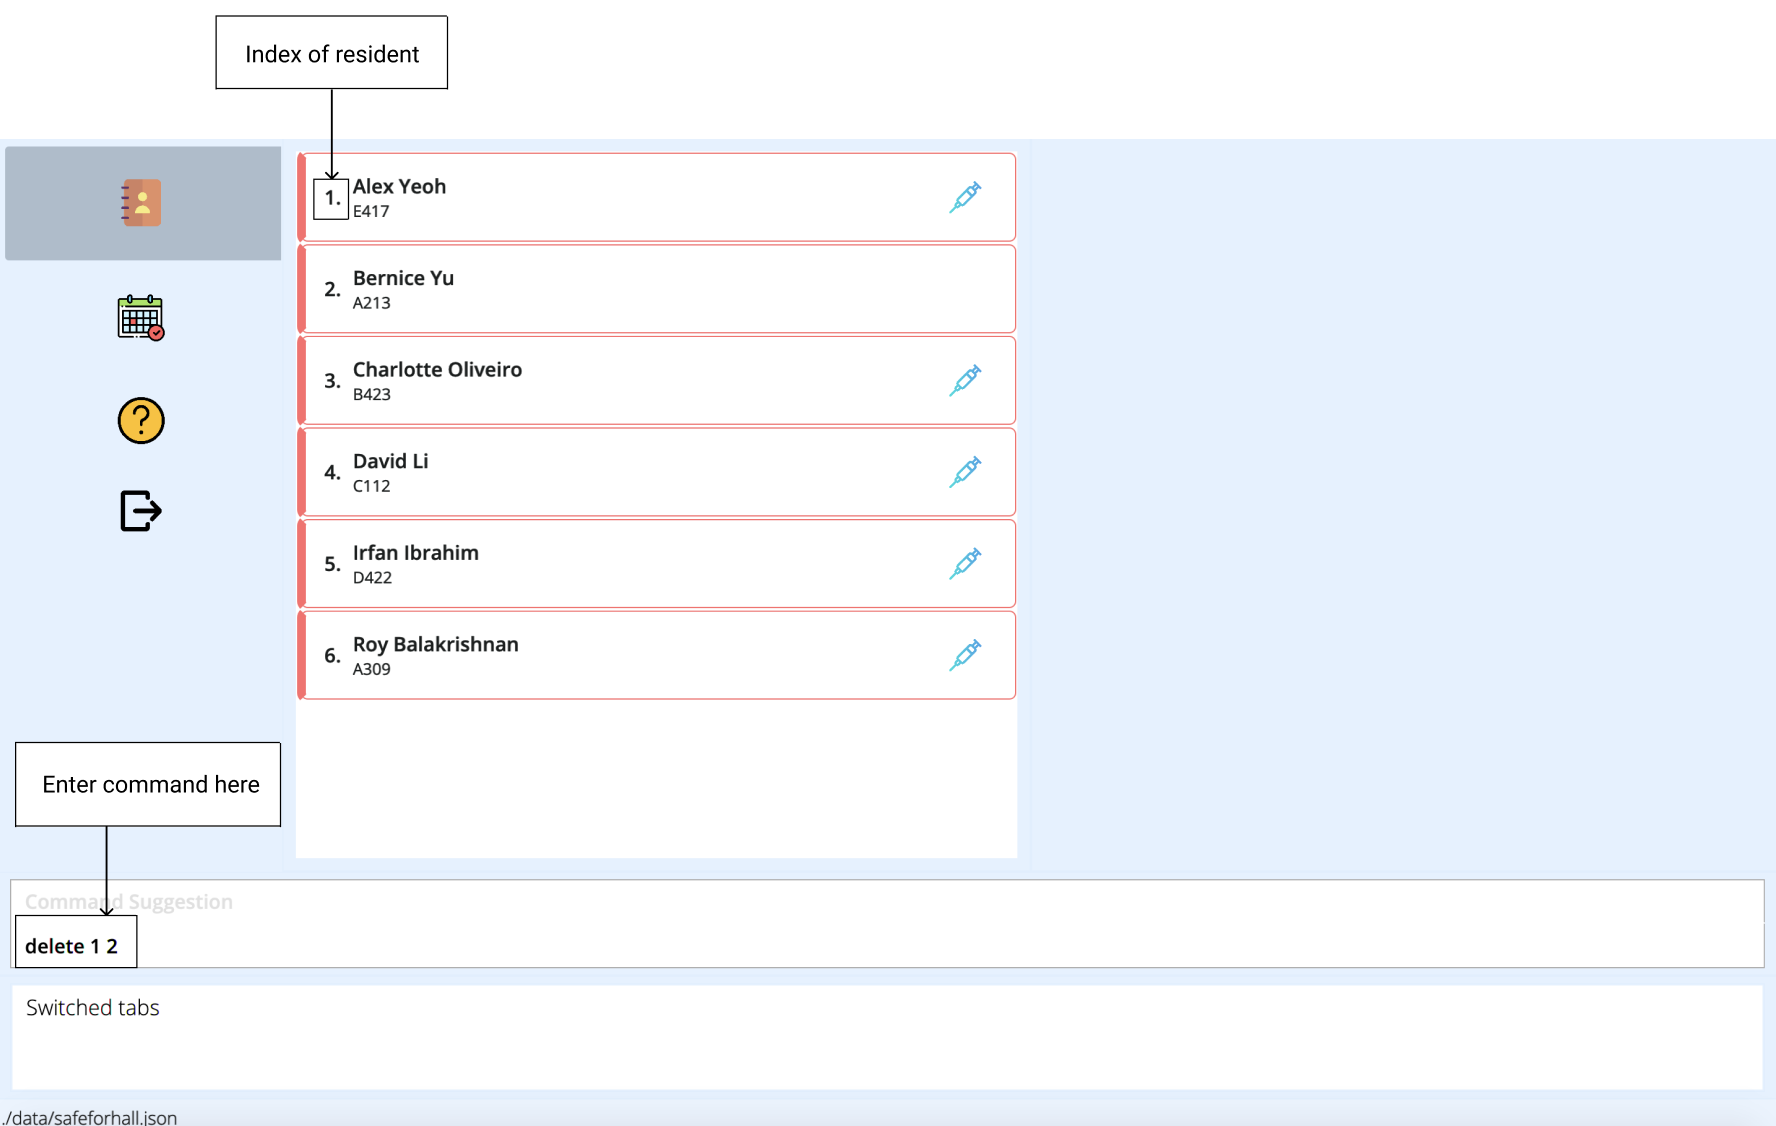
-
The result box will notify you of the deleted residents. Alex Yeoh and Bernice Yu will also be removed from the resident list.
More Examples:
-
viewfollowed bydelete 1 2 3deletes the first 3 residents in the address book. -
find n/Annefollowed bydelete 1deletes the 1st resident named Anne in the results of thefindcommand.
Tracing close contacts : trace
Traces a resident’s close contacts based on the events they’re involved in. This is useful when a COVID case is located within the residence and their close contacts are to be notified of proper procedure to follow.
Format: trace r/RESIDENT [d/DEPTH] [t/DURATION]
| Prefix | Field | Details |
|---|---|---|
r |
Resident | The resident to trace can be identified either by full name or room (case-insensitive) |
d |
Depth | Refers to the maximum allowed links to reach the resident in question It is an integer, 1 <= depth <= 5, and will default to 1 if not specified |
t |
Duration | Represents the time in days to trace back to. It is an integer, 1 <= duration <= 31, and will default to 7 if not specified |
-
Using sample data, running
trace r/Alex Yeoh d/1will trace down residents Charlotte and David since they all were in the Volleyball event.
-
Using sample data, running the above command but with depth 2,
trace r/Alex Yeoh d/2,will trace down resident Irfan in addition, since David in turn was in contact with Irfan during Powerlifting event.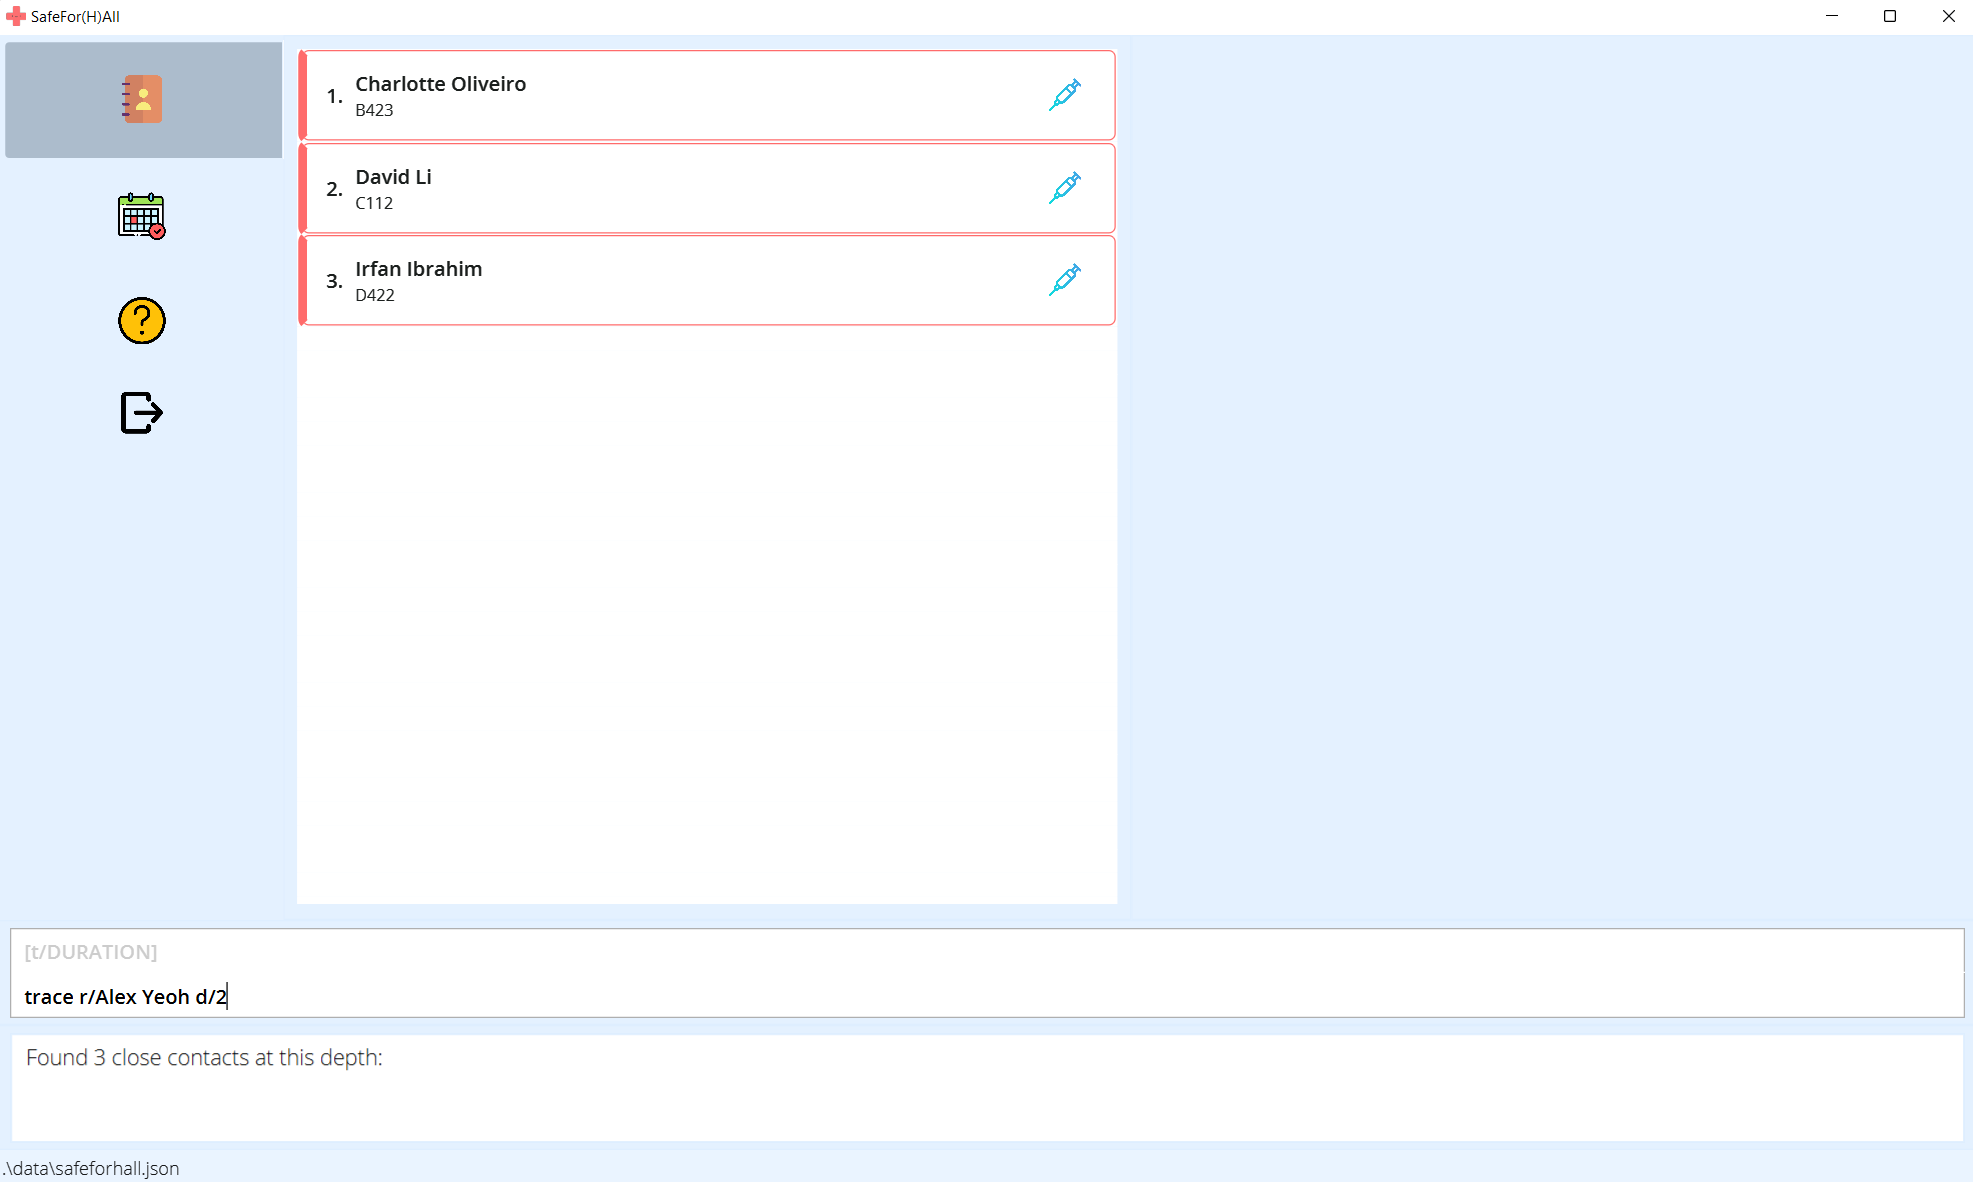
Examples:
-
tracefollowed byr/A101lists the resident’s immediate close contact from events in the past 7 days. -
trace r/Annefollowed byd/2 t/4lists Anne’s immediate contacts and their immediate contacts from events in the past 4 days.
Sorting residents : sort
sort command, simply run view.
Sorts the residents according to specified fields in ascending or descending order
Format: sort by/FIELD o/ORDER
| FIELD | Resident’s field |
|---|---|
n |
Name |
e |
|
r |
Room |
p |
Phone |
f |
Faculty |
v |
Vaccination |
fd |
FET date |
cd |
Collection date |
-
ORDERcan beafor ascending ordfor descending
Examples:
-
sort by/n o/asorts the residents by name in ascending order
Importing resident data : import
Imports resident information from the specified csv file which is to be located within the data/ folder.
Format: import CSV_NAME
![]() Note:
Note:
- 8 comma separated values for each row with values in order;
name,room,phone,email,vaccStatus,faculty,lastFetDate,lastCollectionDate - The first row will be discarded as column headings
-
lastFetDate,lastCollectionDateare optional (can be left as empty space) - The file format (
.csv) is not to be included inCSV_NAME
csv format from an excel file by Save as -> .csv`
Here’s a step by step guide:
-
Create your csv file in the correct format (shown below).

-
Place your csv file in the
data/folder.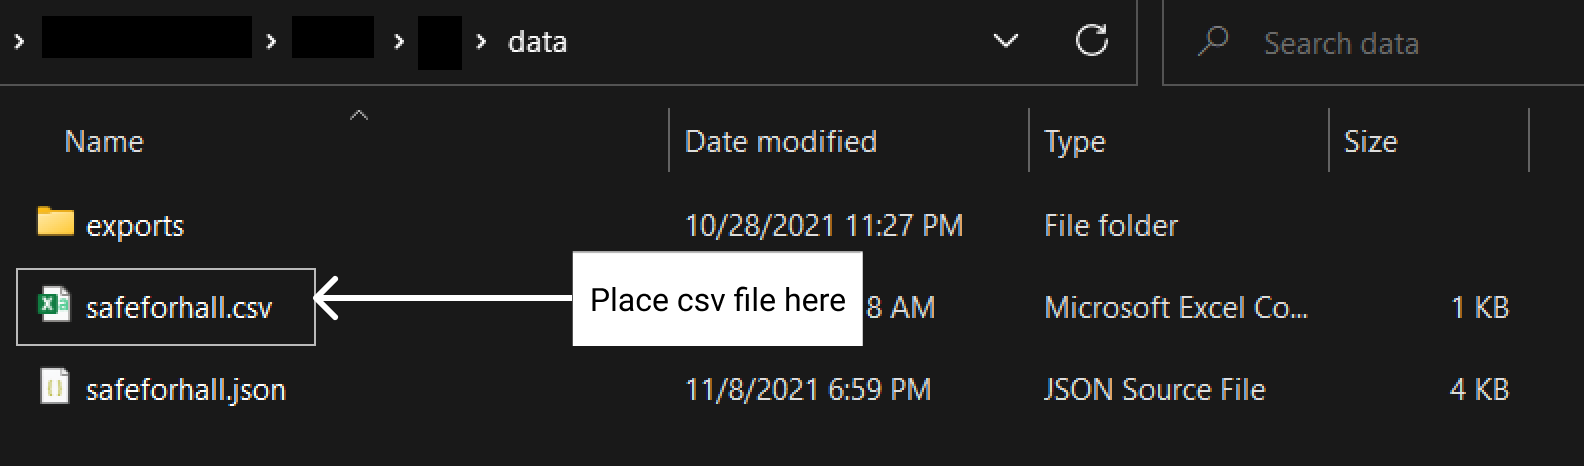
-
Run
import CSV_NAME.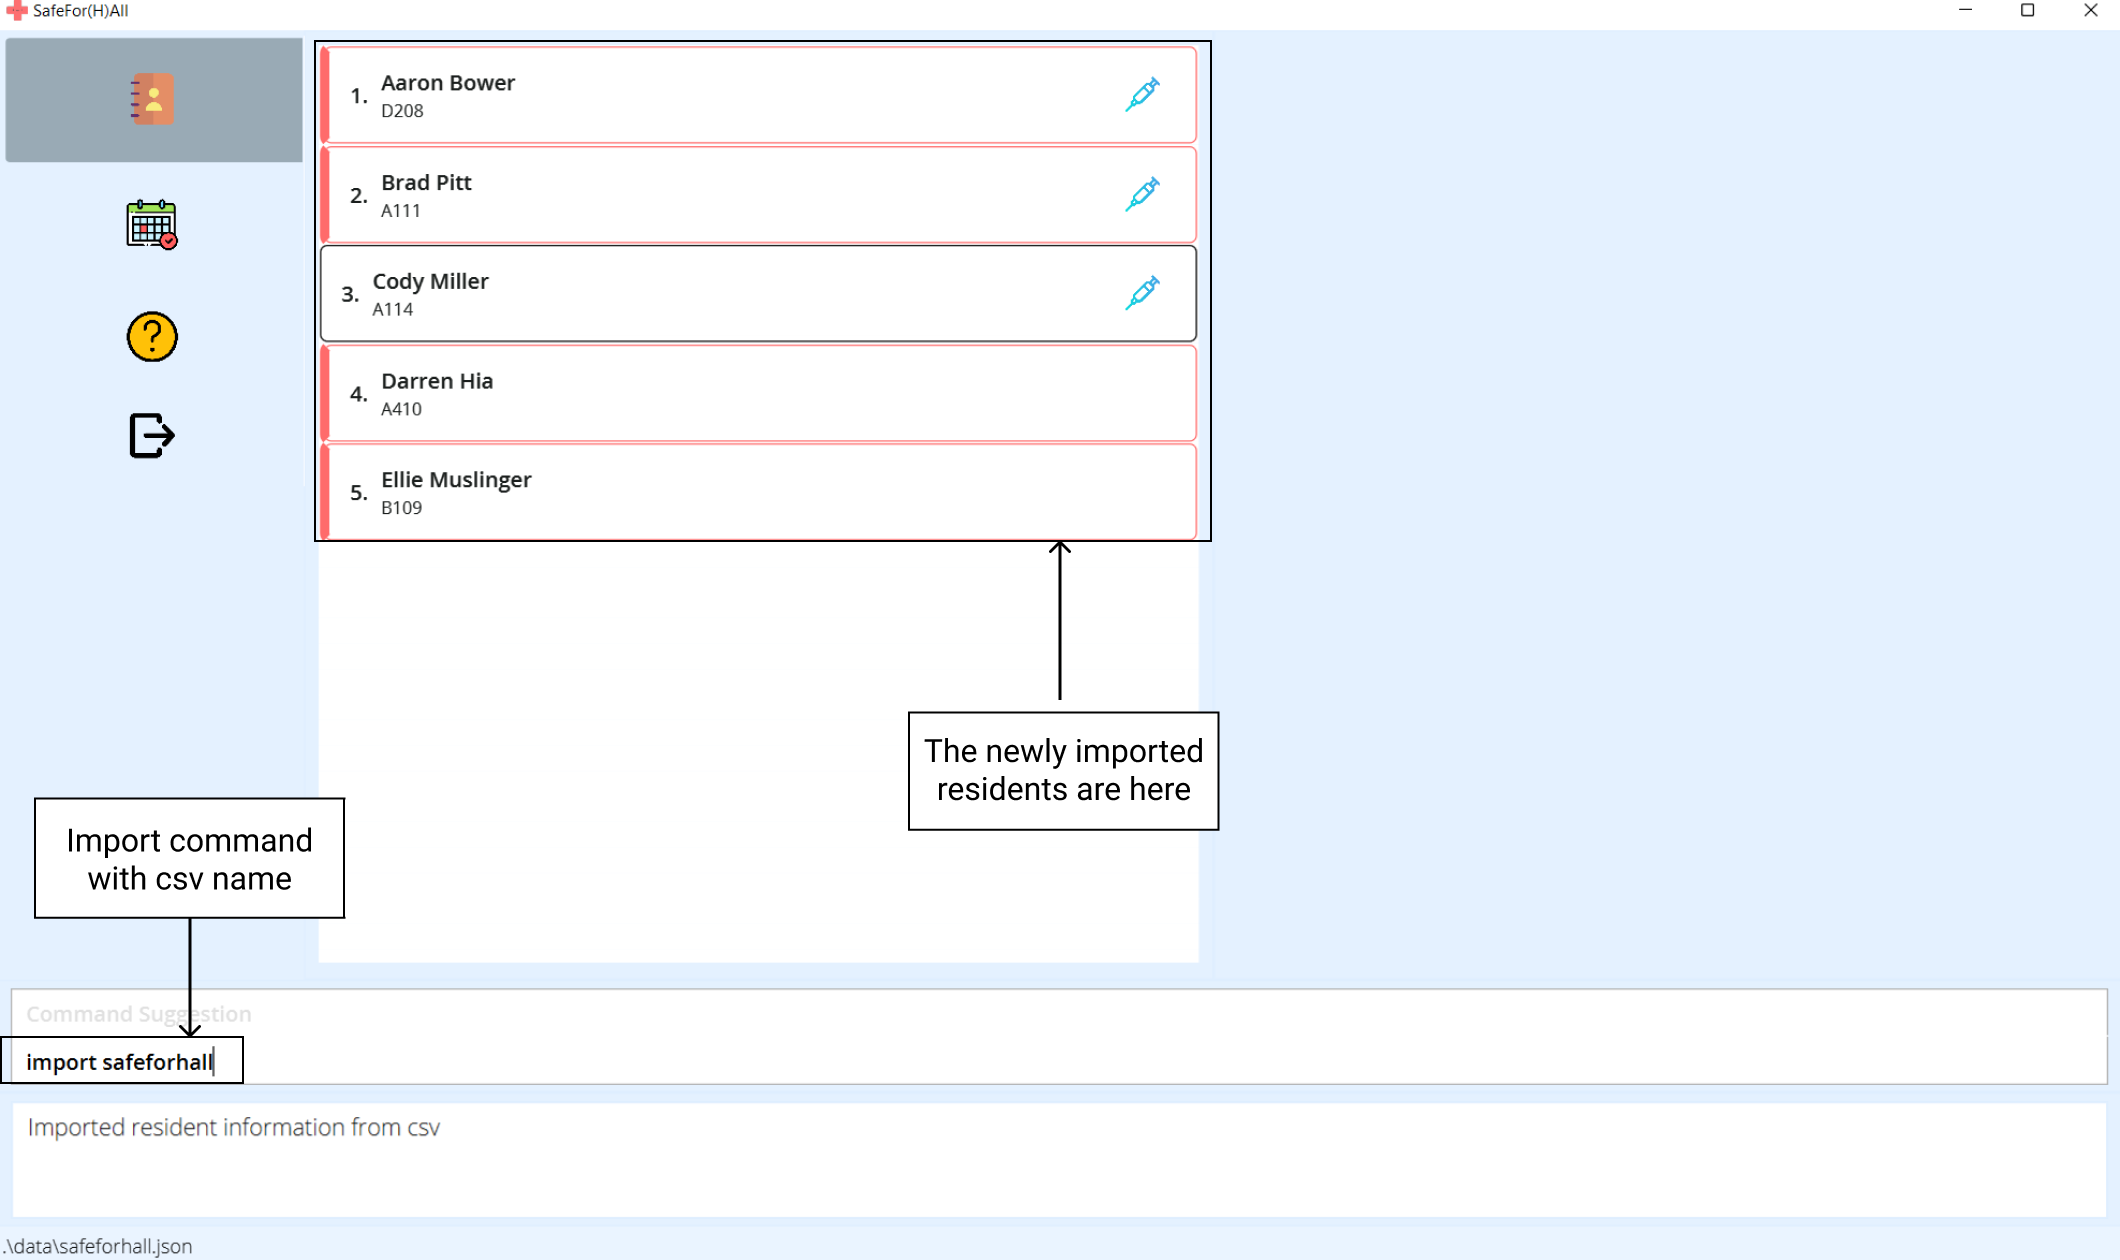
Examples:
-
importfollowed bysafeforhallattempts to read the filesafeforhall.csvwithin thedata/folder.
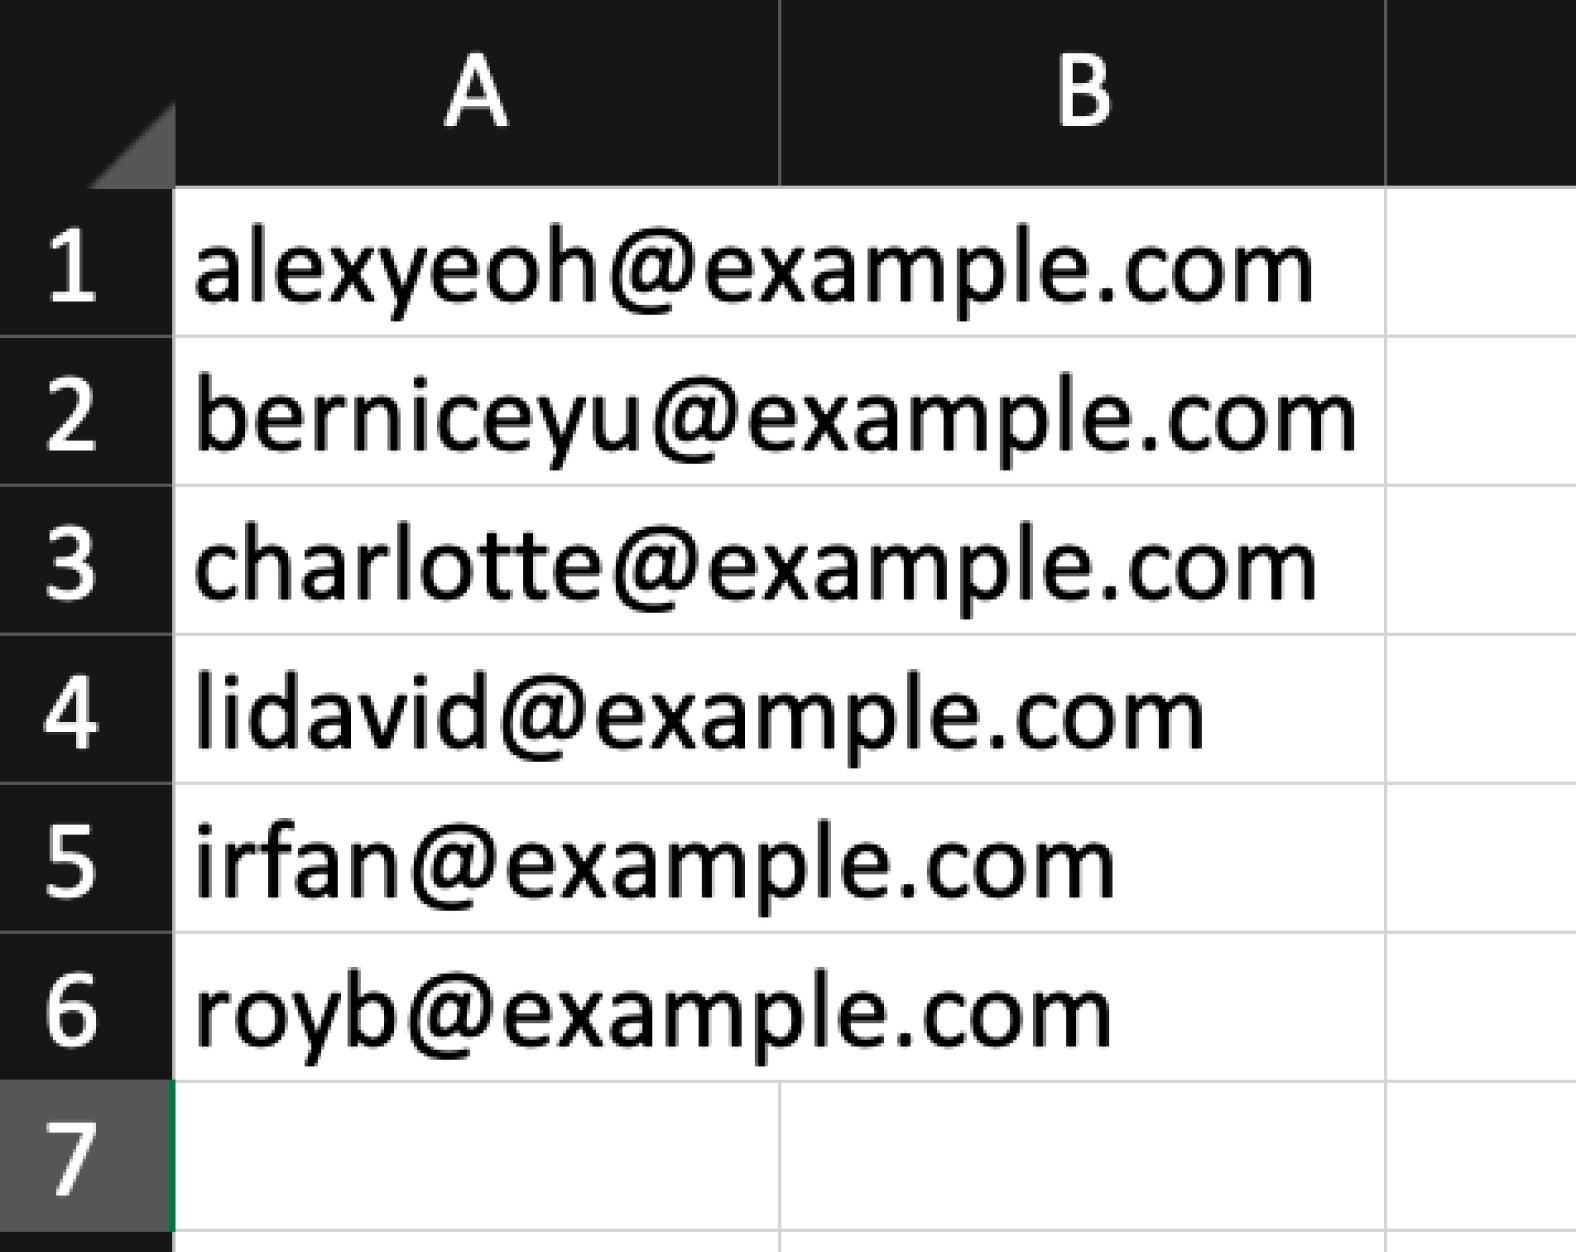
Exporting residents’ emails : export
Exports the emails of all the residents in the last filtered list to a csv file within the data/exports/ folder.
A quick copy-paste of the email addresses from the csv file allows you to send mass emails using modern email clients.
Format: export FILE_NAME
![]() Note:
Note:
- The file format (
.csv) is not to be included in theFILE_NAME
-
Run
export FILE_NAME.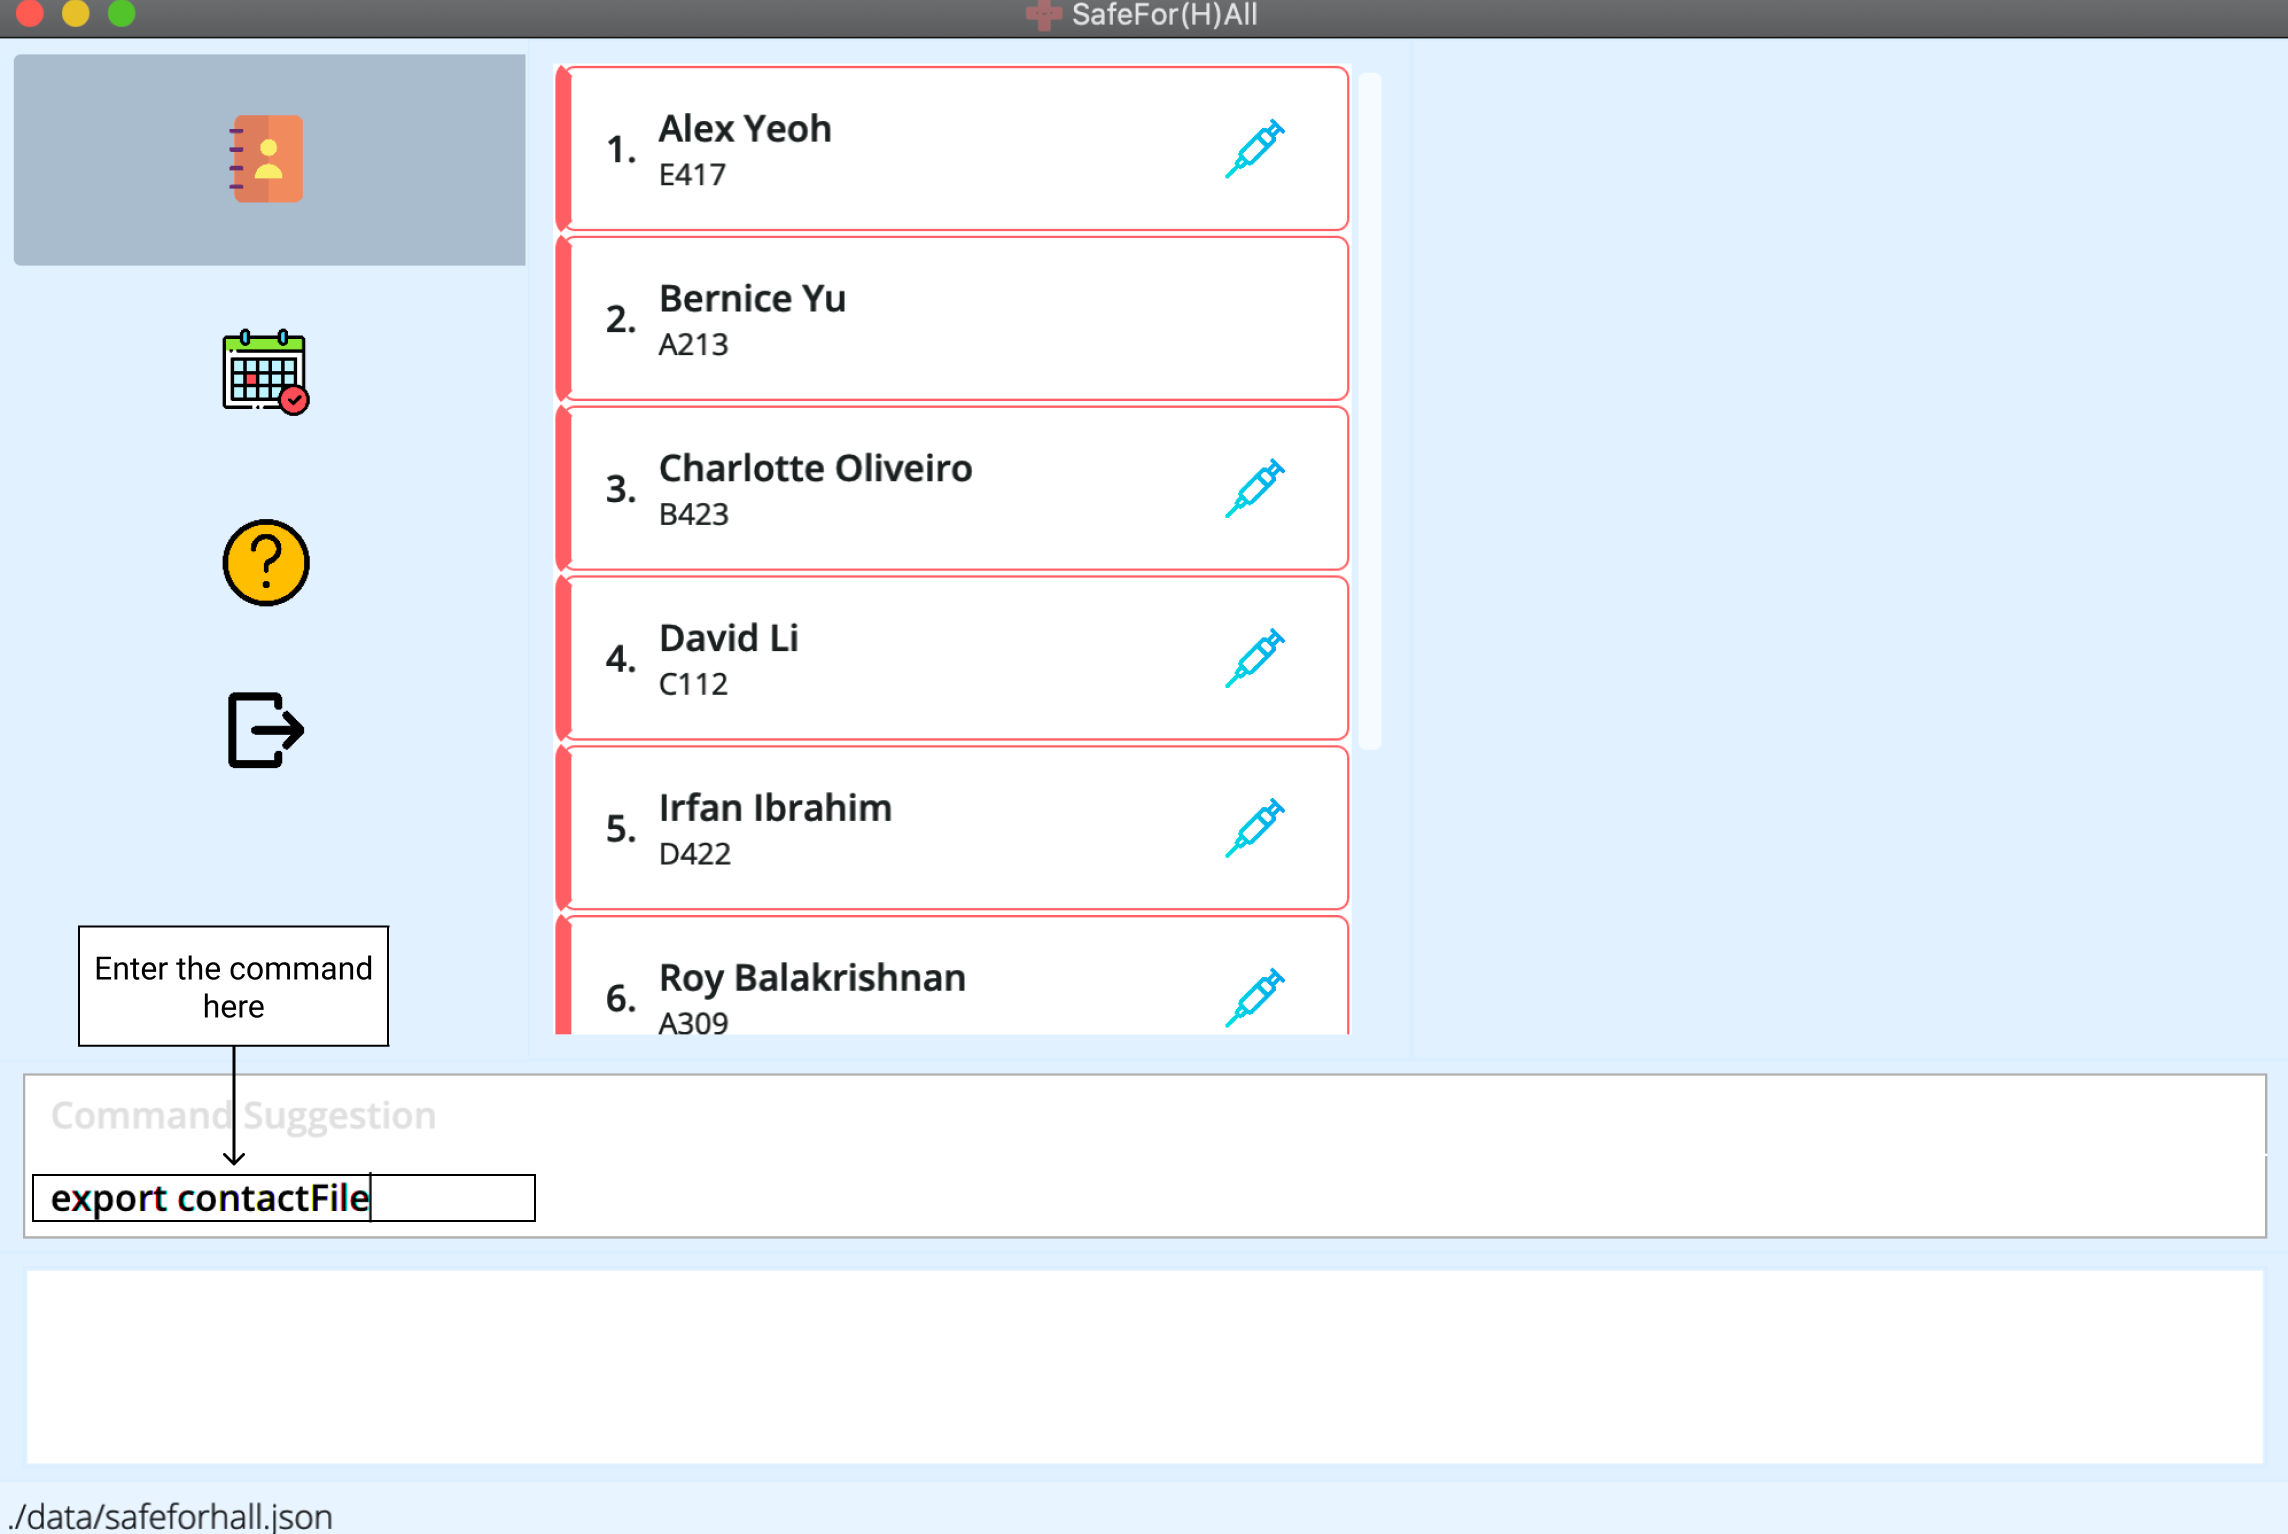
-
Find your csv file in the
data/exportsfolder.
-
Your exported csv file should look like this.
Examples:
-
exportfollowed bysafeforhallcreates asafeforhall.csvwithin thedata/exports/folder, with the emails of all the residents currently displayed on the application.
For Events
These commands will function as specified when run under the Event tab.
Adding an event : add
Adds a new event to the address book.
Format: add n/EVENT_NAME v/VENUE c/CAPACITY d/DATE t/TIME [r/RESIDENTS]
| Prefix | Field | Details |
|---|---|---|
n |
Name | Should only contain alphanumeric characters and spaces, and it should not be blank |
v |
Venue | Should only contain alphanumeric characters and spaces, and it should not be blank |
c |
Capacity | Represents the maximum number of residents allowed in this event and is an integer, 1 <= capacity <= 2147483647 |
d |
Date | Should be of dd-mm-yyyy, dd.mm.yyyy or dd/mm/yyyy format |
t |
Time | Should be of HHmm format |
r |
Residents | Can be identified with either all names or all rooms The number of residents cannot exceed the provided capacity Provided names and rooms are case-insensitive and should be comma-separated |
![]() Note:
Note:
- The combination of
Name(case-insensitive),Venue(case-insensitive),DateandTimeshould be unique
Here’s a step by step guide:
-
Type the
addcommand and the rest of the parameters with help from the command suggestion.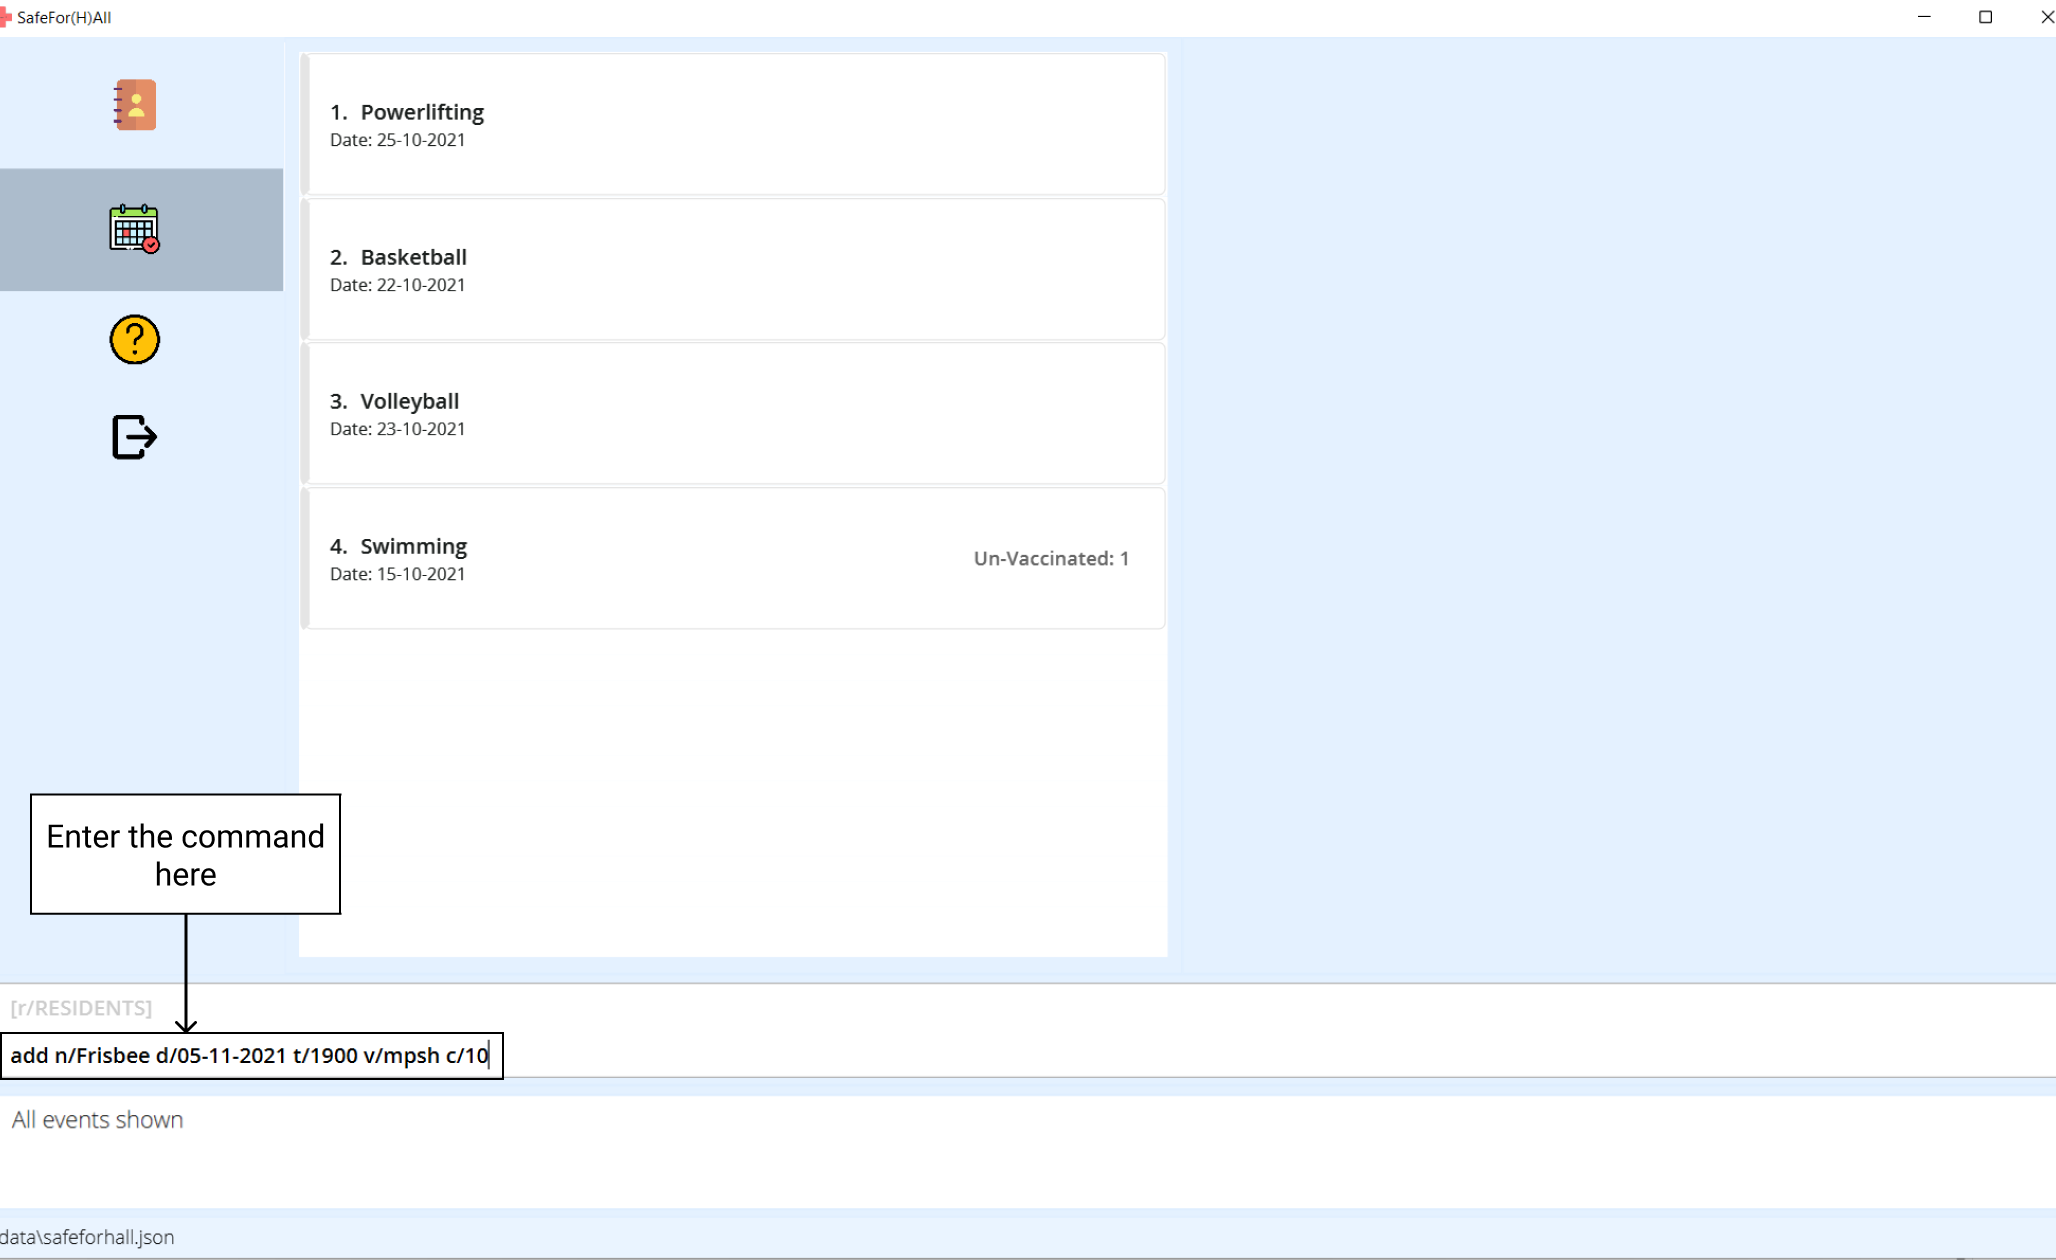
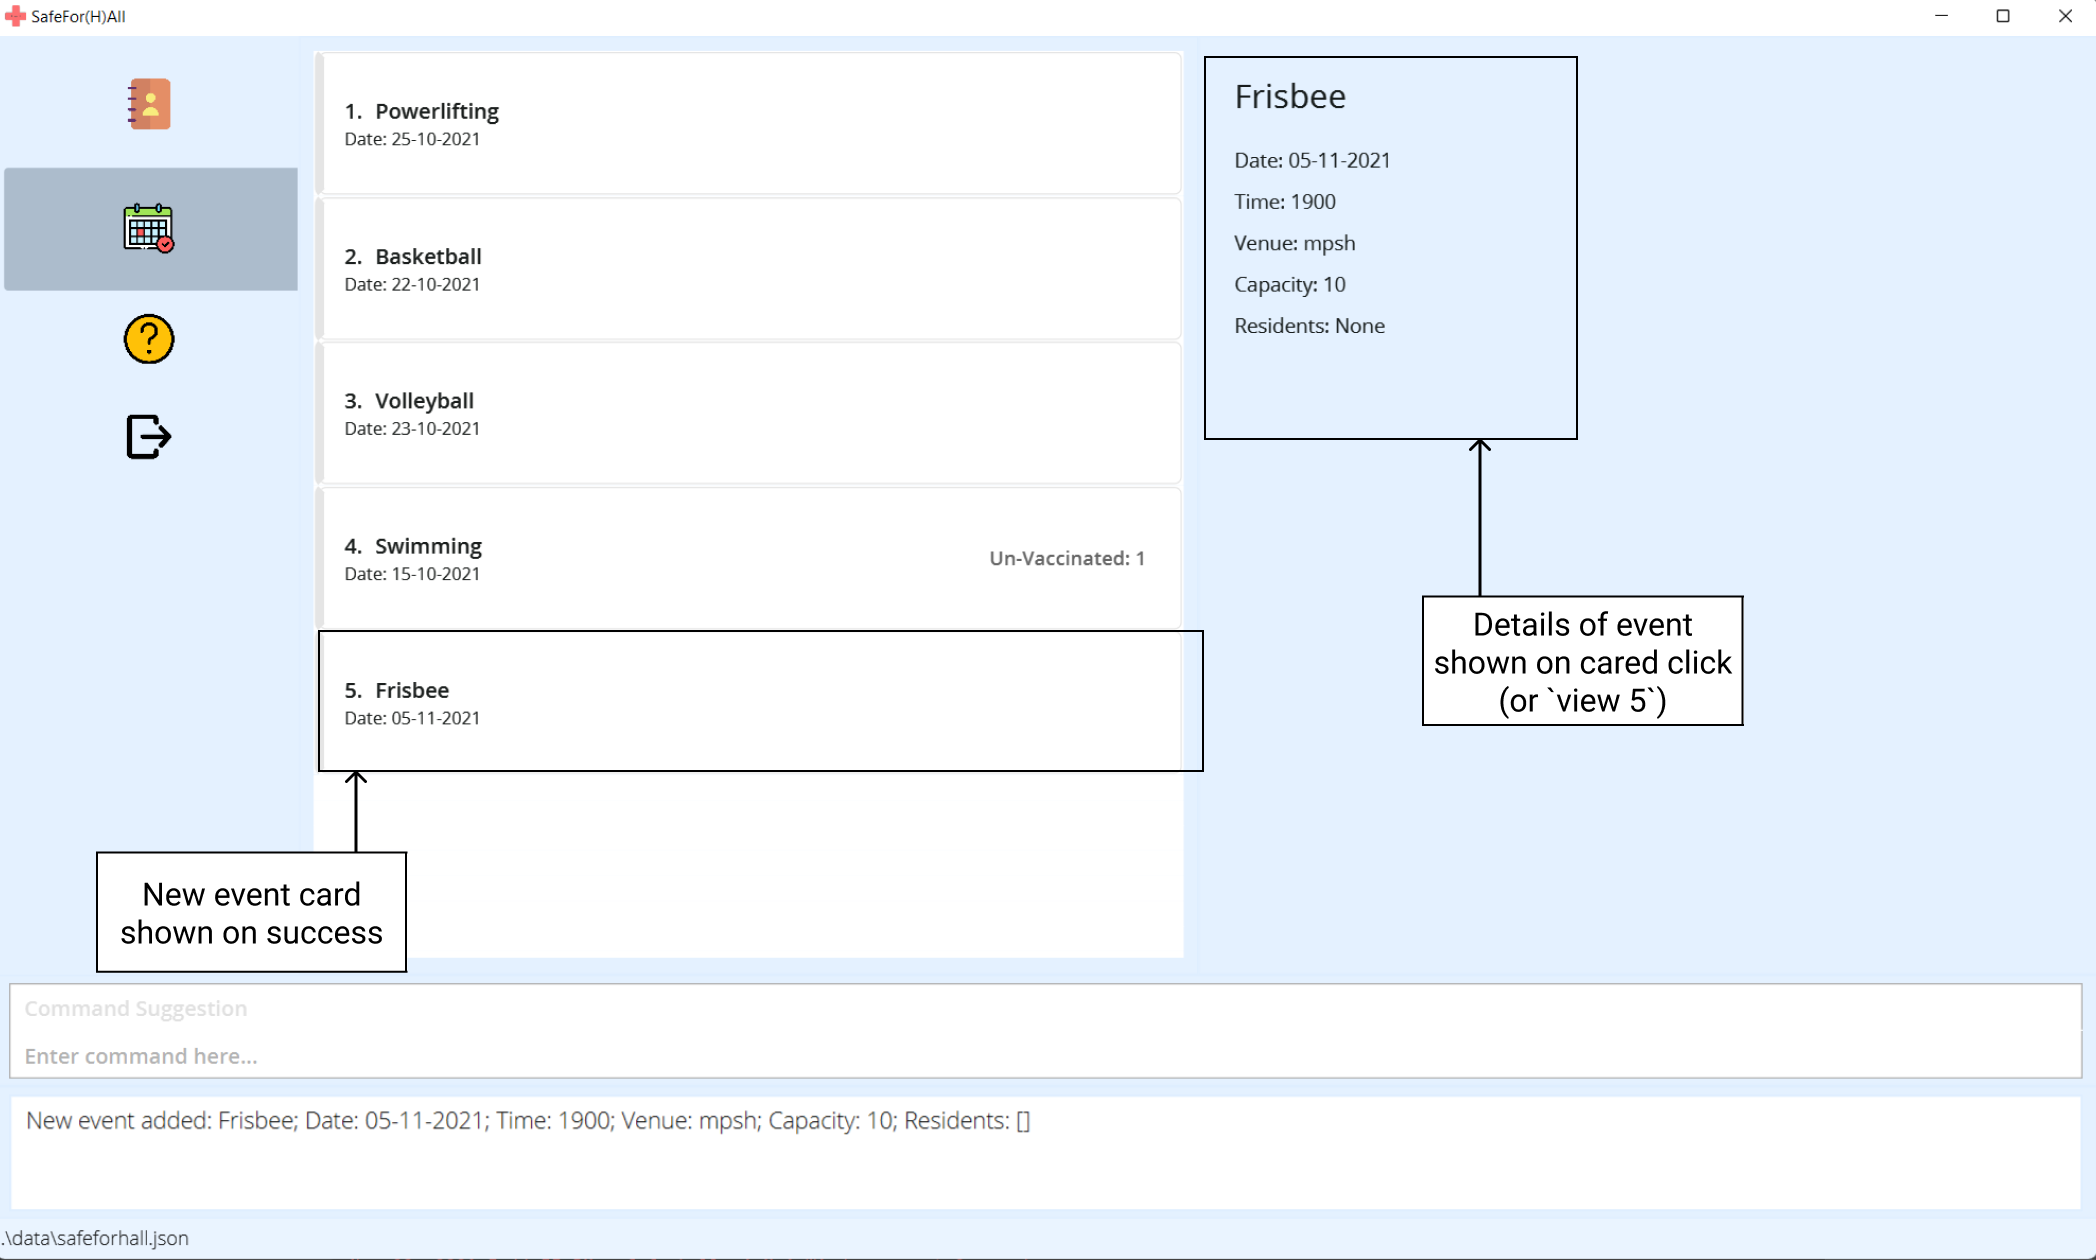
-
After execution, the event list will now show the new event.
Examples:
add n/Swim v/Swimming Pool c/10 d/28-10-2021 t/1500add n/Frisbee v/MPSH c/15 d/30/10/2021 t/1500 r/E201add n/Frisbee v/MPSH c/15 d/30/10/2021 t/1500 r/E201, a121add n/Frisbee v/MPSH c/15 d/30/10/2021 t/1500 r/John Doe, Jane Doe
Viewing events information : view
Shows a numbered list of all the events in the address book.
The index of the event is the corresponding number in the list
shown when view (without the [INDEX] parameter) is called.
Format: view [INDEX]
- For an index i, 1 ≤ i ≤ n, where n is the number of events in the address book
Examples:
-
viewshows a list of all the events -
view 5shows the details of the event at index 5
Editing an event : edit
Edits an existing event in the address book.
Format: edit INDEX [n/EVENT_NAME] [v/VENUE] [c/CAPACITY] [d/EVENT_DATE] [t/EVENT_TIME]
| Prefix | Field | Details |
|---|---|---|
n |
Name | Should only contain alphanumeric characters and spaces, and it should not be blank |
v |
Venue | Should only contain alphanumeric characters and spaces, and it should not be blank |
c |
Capacity | Represents the maximum number of residents allowed in this event and is an integer, 1 <= capacity <= 2147483647 |
d |
Date | Should be of dd-mm-yyyy, dd.mm.yyyy or dd/mm/yyyy format |
t |
Time | Should be of HHmm format |
- Edits the event at the specified
INDEX. - The index refers to the index number shown in the displayed event list.
- The index must be a positive integer 1, 2, 3, …
- At least one of the optional fields must be provided.
- Existing values will be updated to the input values.
Example:
Let’s say that Powerlifting changed the date and time of their event from 25 Oct 2021 8:00AM to 26 Oct 2021 9:00AM.
You can easily update these details in a single edit command.
-
Note that Powerlifting’s index is reflected as 1 in the current list of events. To update the date and time of the event, simply enter
edit 1 d/26-10-2021 t/0900.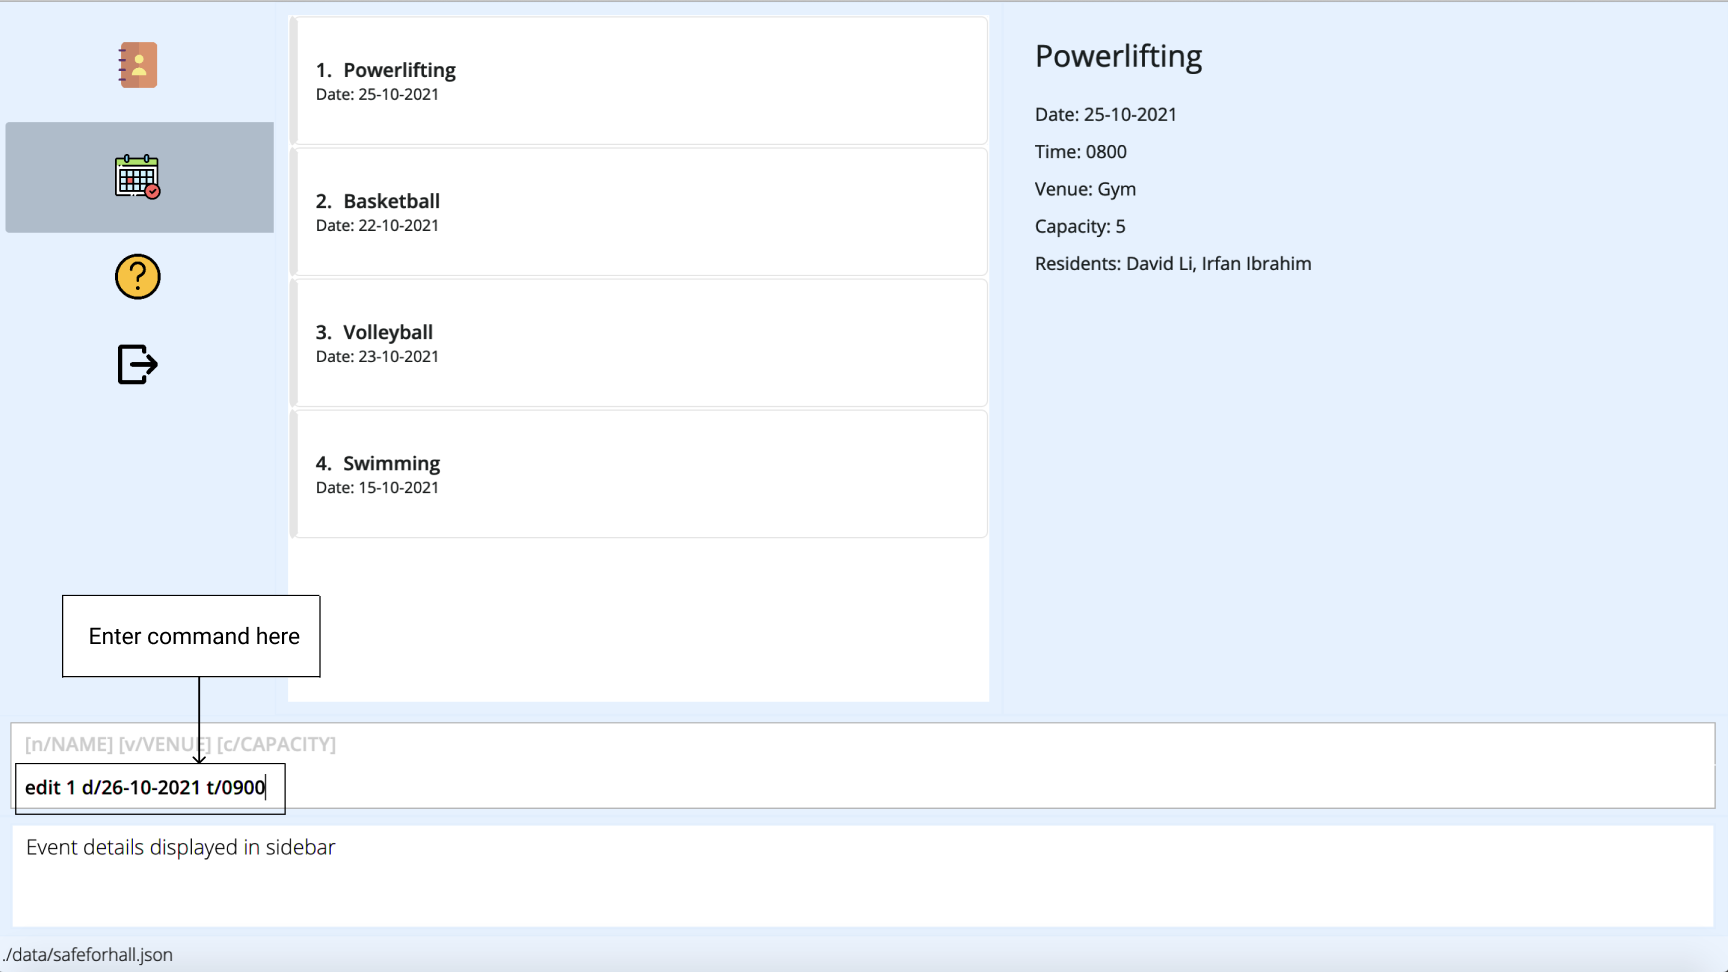
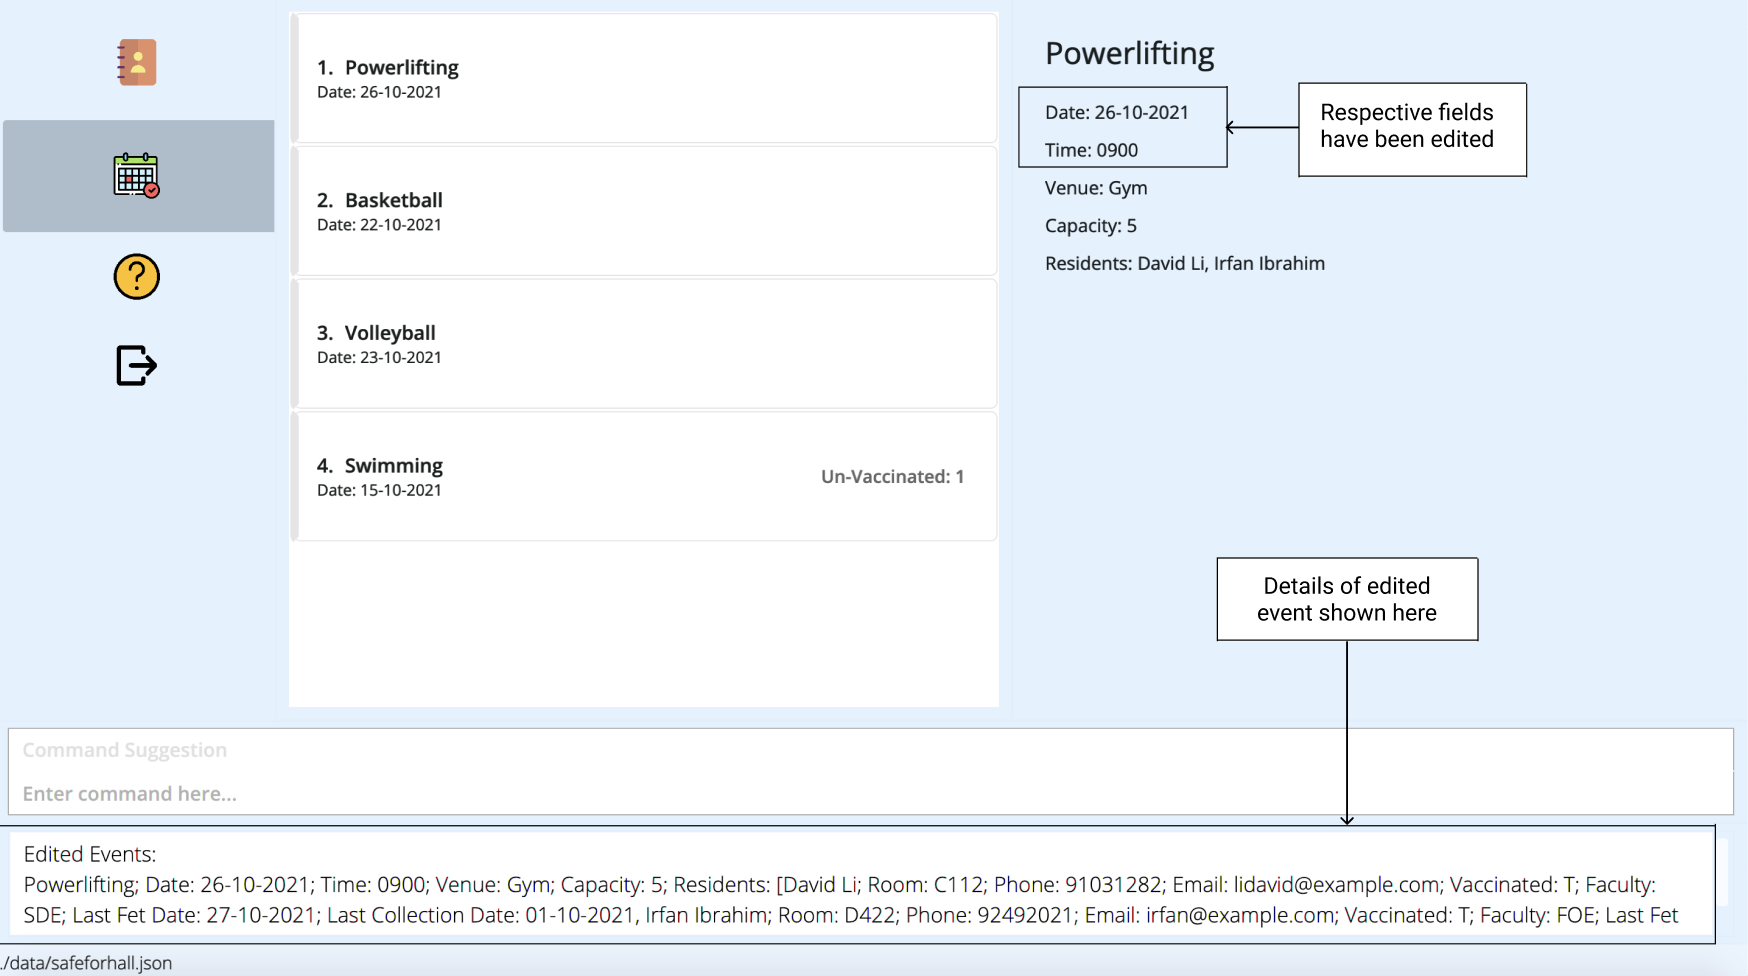
-
The result box will display the updated details of the event. The event list will also be updated to contain the modified event details.
More Examples:
-
edit 1 n/Football Training v/Field c/50Edits the name, venue, and capacity of the 1st event in the event list to beFootball Training,Field, and50respectively.
Searching by event information: find
Shows a list of events that match the provided keywords for different available parameters. Allowed flags include; n/, d/, v/, c/
Format: find [PREFIX/KEYWORD]...
| Prefix | Field | Restrictions |
|---|---|---|
n |
Name | - It is case-insensitive. e.g dance will match Dance - Keywords will be matched without the need to enter the full event name. e.g Band will match Band training - Events matching at least one keyword for the event name will be returned (i.e. OR search). e.g Football Basketball will return Football Training, Basketball Training
|
v |
Venue | - It is case-insensitive. e.g nus field will match NUS Field - Only full event names will be matched. e.g Field will not match NUS Field
|
d, c |
Date, Capacity | - Subject to the same validity conditions as in the Add Event Command |
Examples:
-
find n/FootballreturnsFootball MatchandFootball Training -
find v/NUS field c/5returns all the events atNUS fieldwhich have a capacity of5 -
find d/03-01-2021returns all the events which occur on the date03-01-2021
Deleting an event : delete
delete command cannot be undone! Do make sure that you have entered the command correctly before running it.
Deletes specified events from the address book.
Format: delete INDEX…
- Delete the events at the specified
INDEX…. - Each index refers to the index number shown in the displayed event list.
- The indexes must be positive integers 1, 2, 3, …
- Delete multiple events in a single command by inputting multiple indexes, each separated by a space.
Example:
Suppose Football Training is cancelled due to a tightening of COVID-19 measures. To keep the addressbook updated, you might want to remove the event from the list of events.
You can easily do this a single delete command.
-
Note that the event “Football Training” has an index of 2 in the current event list. To remove it from the list of events, simply enter
delete 2.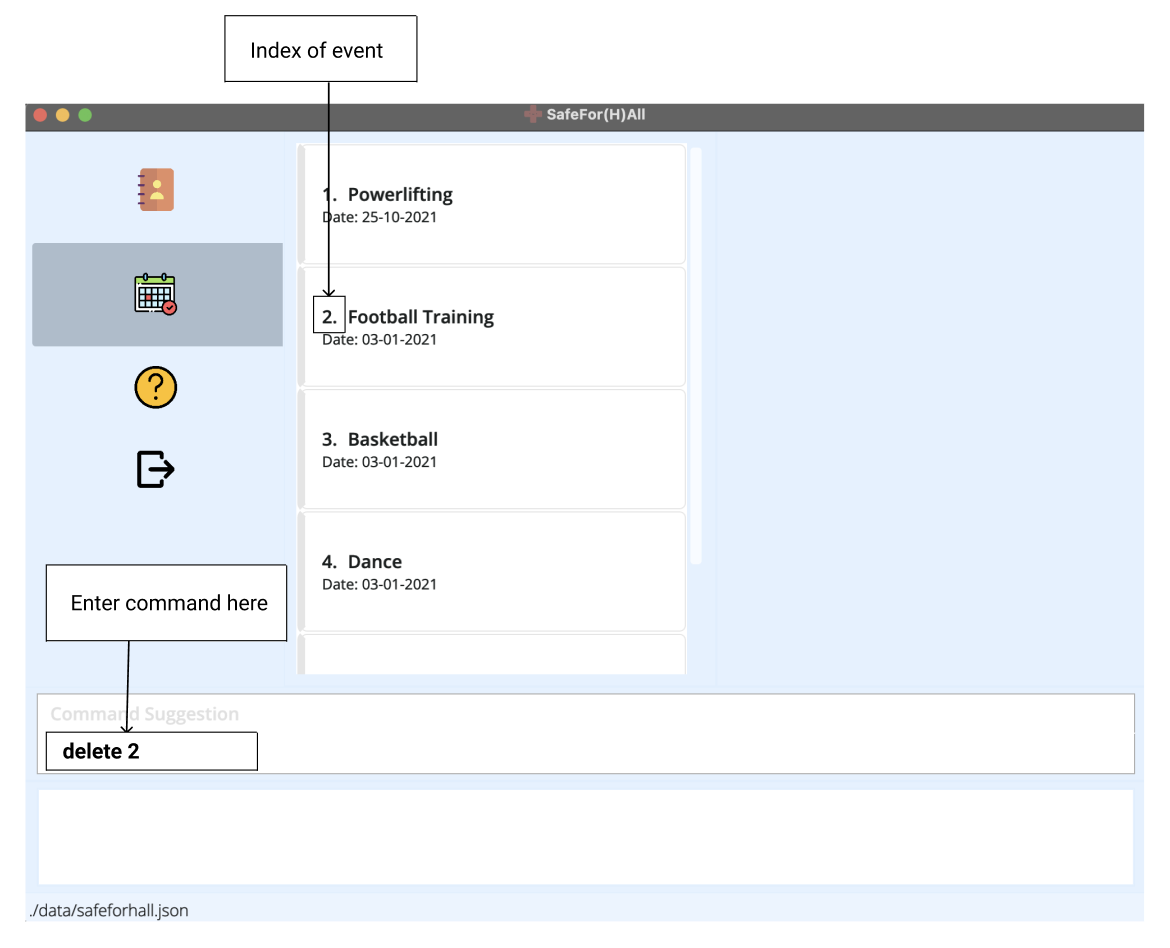
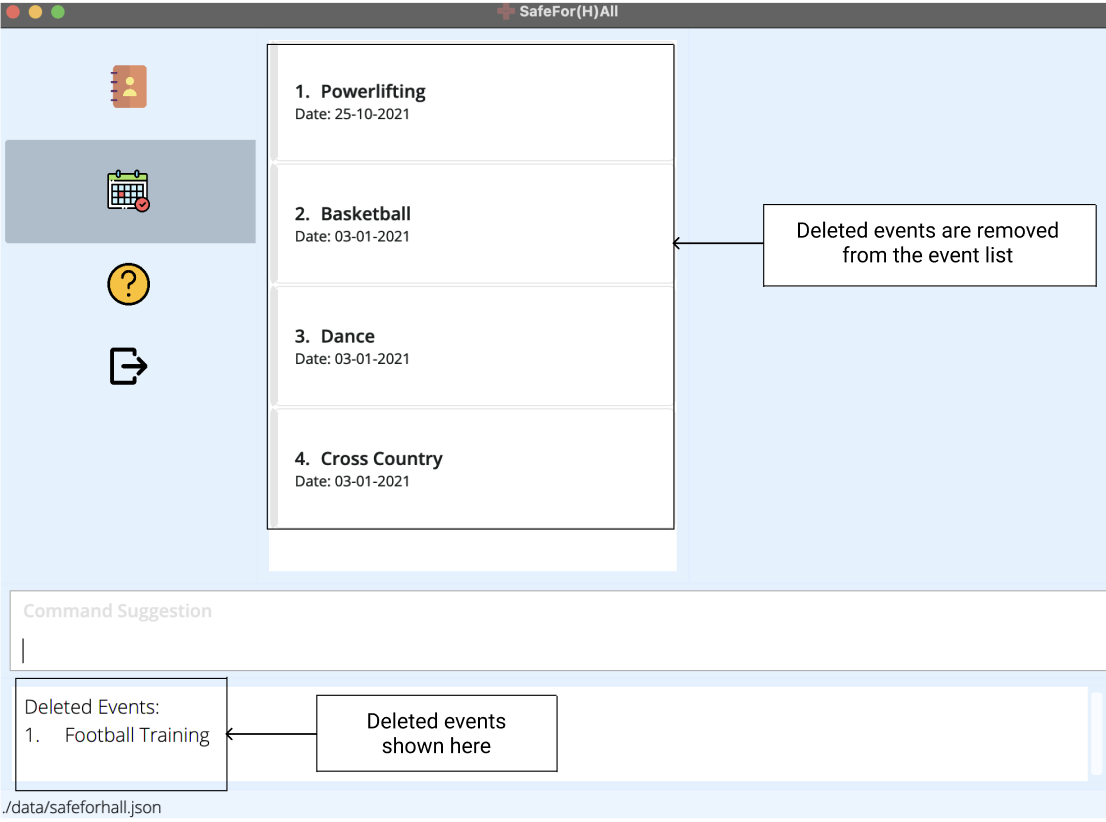
-
The result box will notify you of the deleted event. The event will also be removed from the event list.
More Examples:
-
viewfollowed bydelete 1 2 3deletes the first 3 events in the address book. -
find n/Football Trainingfollowed bydelete 1deletes the 1st event named Football Training in the results of thefindcommand.
Add residents to an event: include
Add multiple residents to an event based on the information given(name or room number), a resident is only expected to be given a name or a room.
Format: include INDEX r/RESIDENTS
![]() Note:
Note:
- Residents can be given in the form of
names/rooms, but all has to be allroomsor allnames - The residents’
names/roomsinputted have to exist in the address book under theResidentTab to be added to anEvent - When adding multiple
names/rooms, each resident’sname/roomis separated by a comma - The resident’s
name/roominputted is case-insensitive
Here’s a step-by-step guide:
-
Type the
includecommand with theindexof the event, and thenames/roomsof the residents to include to the event. When adding multiplenames/rooms, remember to separate thenames/roomsby a comma.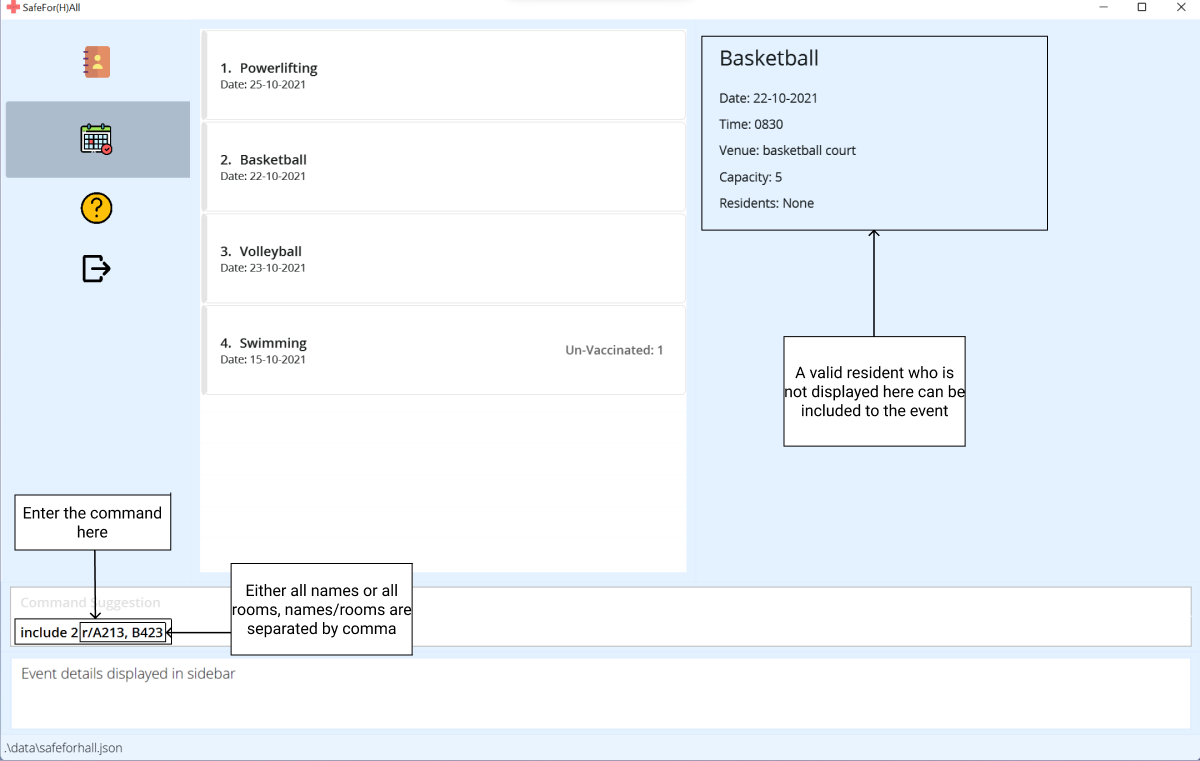
-
The sidebar will now show the updated list of residents in the event.
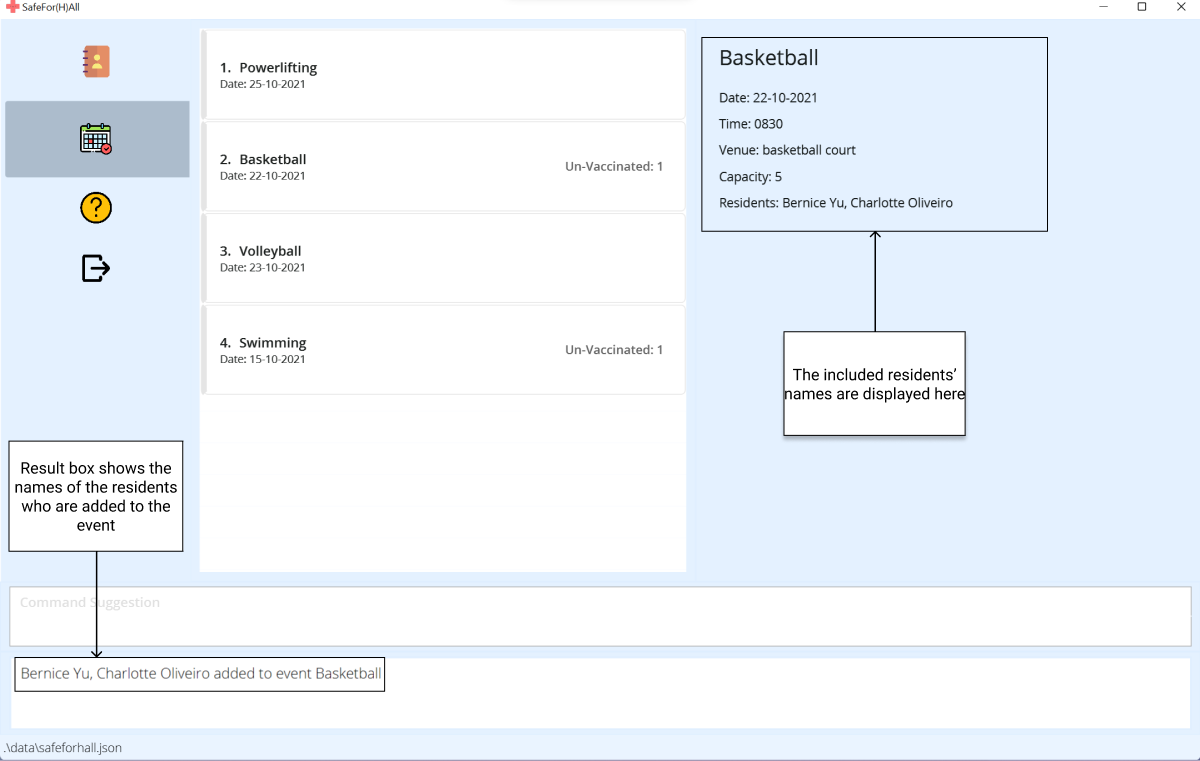
Examples:
-
include 1 r/A101adds the resident who stays in room A101 to the first event in the address book -
include 2 r/A101, A102, A103adds the residents who stay in rooms A101, A102 and A103 to the second event in the address book -
include 3 r/John Doeadds John Doe to the third event in the address book -
include 4 r/John Doe, Jane Doeadds John Doe and Jane Doe to the fourth event in the address book
Remove residents from an event: exclude
Remove multiple residents from an event based on the information given(name or room number), a resident is only expected to be given a name or a room.
Format: exclude INDEX r/RESIDENTS
![]() Note:
Note:
- Residents can be given in the form of
names/rooms, but all has to be allroomsor allnames - The residents’
names/roomsinputted have to be involved in theEventunder theEventTab, to be removed from that event - When removing multiple
names/rooms, each resident’sname/roomis separated by a comma - The resident’s
name/roominputted is case-insensitive
Here’s a step-by-step guide:
-
Type the
excludecommand with theindexof the event, and thenames/roomsof the residents to exclude from the event. When removing multiplenames/rooms, remember to separate thenames/roomsby a comma.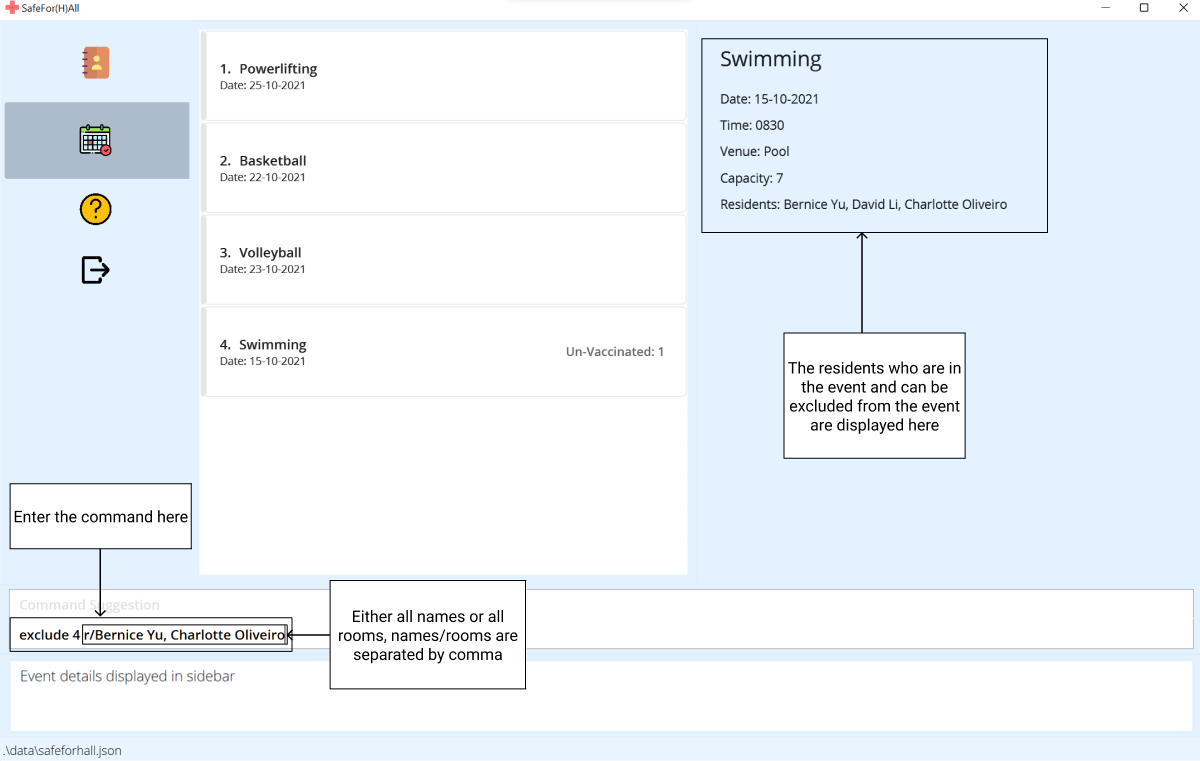
-
The sidebar will now show the updated list of residents in the event.
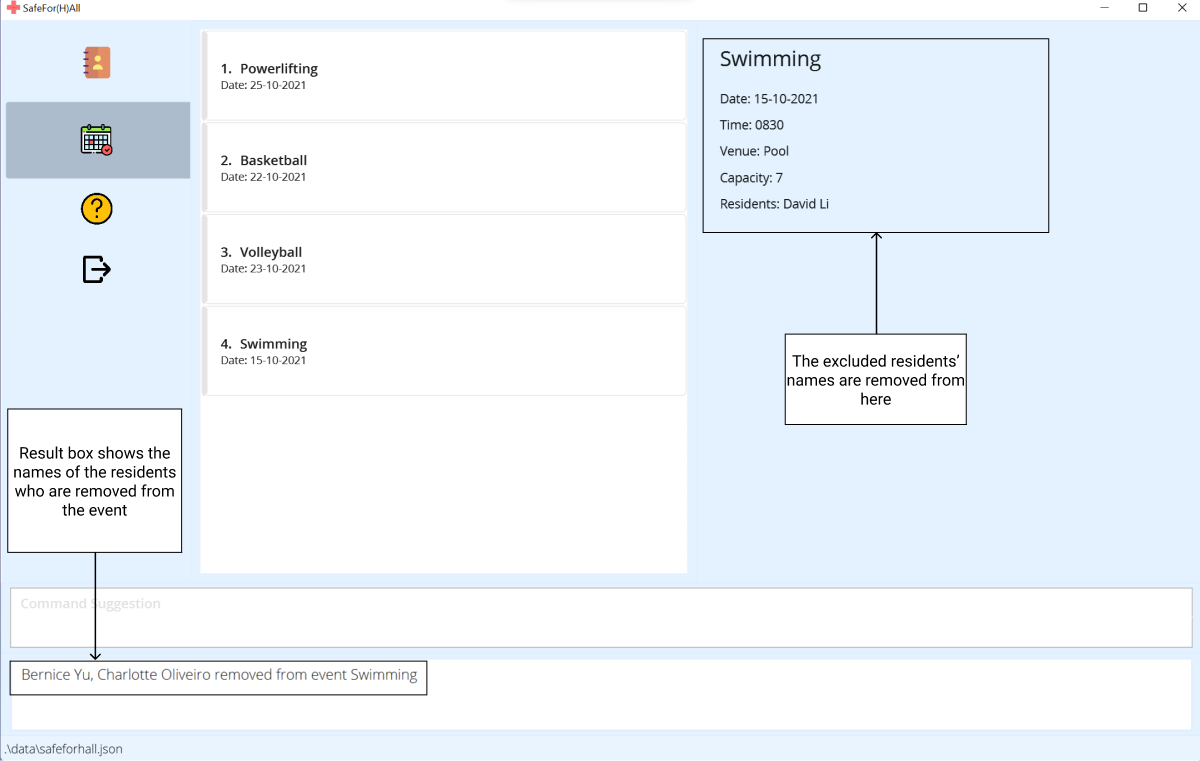
Examples:
-
exclude 1 r/A101removes the resident who stays in room A101 from the first event in the address book -
exclude 2 r/A101, A102, A103removes the residents who stay in rooms A101, A102 and A103 from the second event in the address book -
exclude 3 r/John Doeremoves John Doe from the third event in the address book -
exclude 4 r/John Doe, Jane Doeremoves John Doe and Jane Doe from the fourth event in the address book
Sorting events : sort
sort command, simply run view.
Sorts the events according to specified fields in ascending or descending order.
Format: sort by/FIELD o/ORDER
| FIELD | Event’s field |
|---|---|
n |
Name |
d |
Date and Time |
c |
Capacity |
v |
Venue |
-
ORDERcan beafor ascending ordfor descending
Examples:
-
sort by/n o/asorts the events by name in ascending order -
sort by/d o/asorts the events by date and time from old to new -
sort by/d o/dsorts the events by date and time from new to old
Commons
These commands will function the same in either tab.
Viewing help : help
Provides a short summary of the commands and a hyperlink for the user to reach this online user guide.
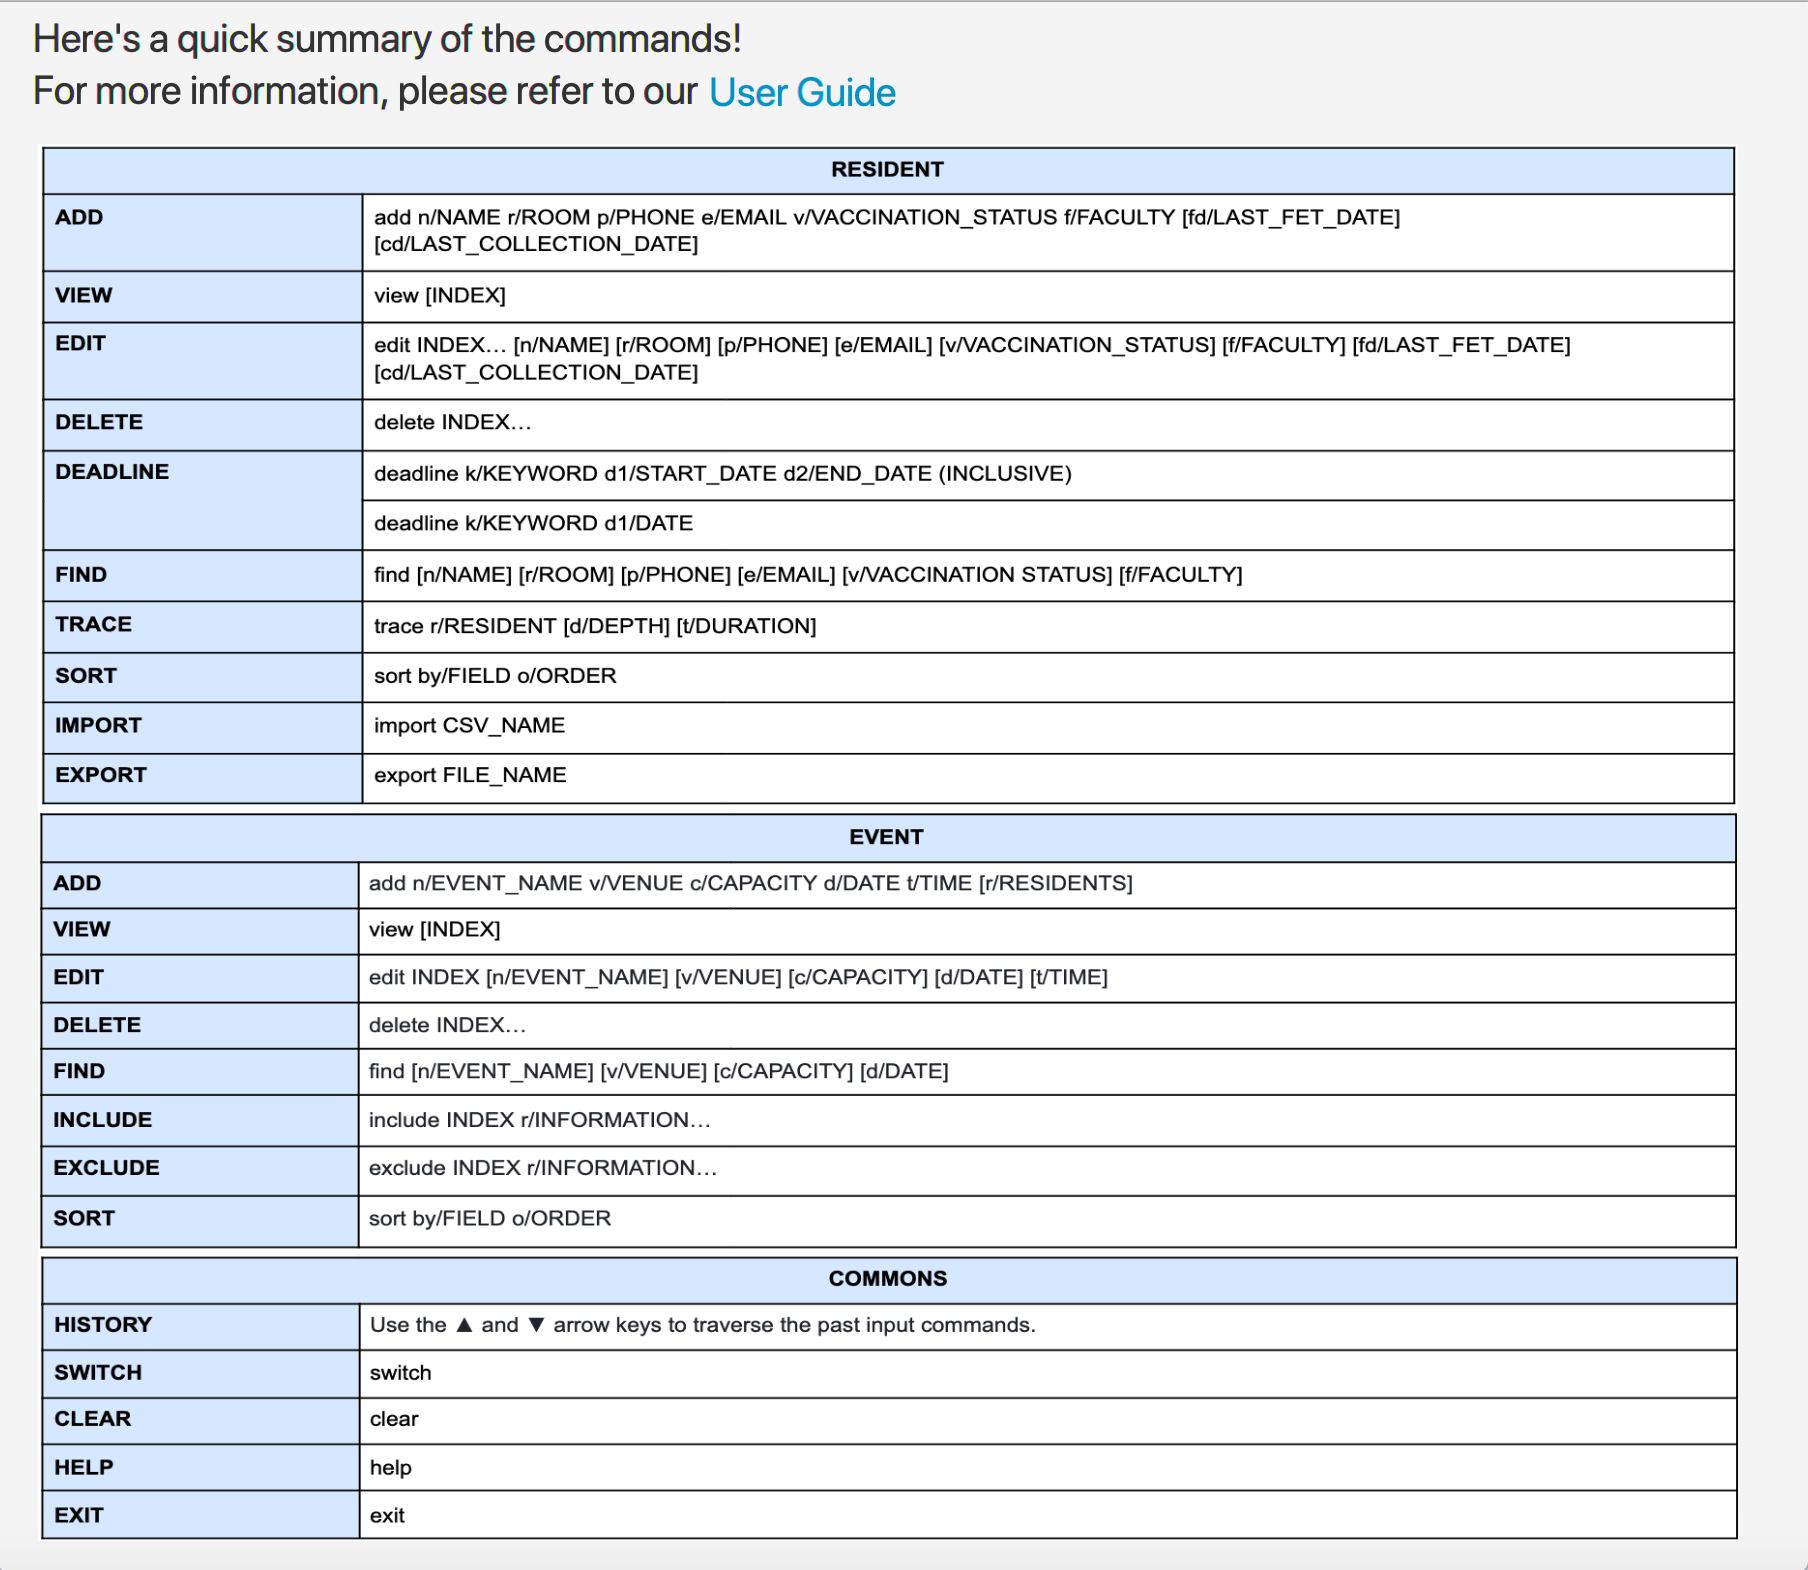
Format: help
Switching tabs: switch
Toggles between the Residents and Events tab.
Format: switch
Command history
The up and down arrow keys when used with the input box in focus, allows traversal of past input commands to increase of use and efficiency.
Command suggestion
A suggested string of parameters is displayed above the input box when a valid command is entered, parameters that have their prefixes entered correctly are removed from this suggestion.
Clearing all entries : clear
Clears all entries from the address book, including entries from the Resident Tab and the Event Tab. Data cleared cannot be retrieved and this command should be used with caution. A sample data can be retrieved by removing the safeforhall.json file from /data
Format: clear
Exiting the program : exit
Exits the program.
Format: exit
Prefix summary
Resident Prefix
| PREFIX | Description | Usage |
|---|---|---|
n/ |
Name |
add, edit, find
|
p/ |
Phone number |
add, edit, find
|
e/ |
Email address |
add, edit, find
|
r/ |
Room |
add, edit, find
|
v/ |
Vaccination status |
add, edit, find
|
f/ |
Faculty |
add, edit, find
|
fd/ |
Last FET date |
add, edit
|
cd/ |
Last collection date |
add, edit
|
k/ |
Keyword | deadline |
d1/ |
Date 1 | deadline |
d2/ |
Date 2 | deadline |
r/ |
Resident | trace |
d/ |
Depth | trace |
t/ |
Duration | trace |
by/ |
Field | sort |
o/ |
Order | sort |
Event Prefix
| PREFIX | Description | Usage |
|---|---|---|
n/ |
Name |
add, edit
|
v/ |
Venue |
add, edit
|
c/ |
Capacity |
add, edit
|
d/ |
Date |
add, edit
|
t/ |
Time |
add, edit
|
r/ |
Residents |
add, include, exclude
|
by/ |
Field | sort |
o/ |
Order | sort |
Command summary
Resident Commands
| Command | Format | Examples |
|---|---|---|
| Add | add n/NAME p/PHONE_NUMBER e/EMAIL r/ROOM v/VACCINATION_STATUS f/FACULTY [fd/LAST_FET_DATE] [cd/LAST_COLLECTION_DATE] |
add n/Betsy Crowe e/betsyc@example.com v/F r/B400 p/1234567 f/FASS fd/20-10-2021 cd/23-10-2021 |
| View | view [INDEX] |
view 30 |
| Deadline |
deadline k/KEYWORD d1/DATE1 d2/DATE ordeadline k/LATE_KEYWORD d1/DATE1
|
deadline k/f d1/15-08-2021 d2/20-08-2021 ordeadline k/lf d1/15-08-2021
|
| Find | find [PREFIX/KEYWORD]... |
find n/john alex v/false f/fass |
| Edit | edit INDEX… [FLAG/UPDATED_PARTICULARS]… |
edit 1 2 3 v/true fd/20-10-2021 |
| Delete | delete INDEX… |
delete 1 2 3 |
| Trace | trace r/RESIDENT [d/DEPTH] [t/DURATION] |
trace r/D201 d/2 t/4 |
| Sort | sort by/FIELD o/ORDER |
sort by/n o/a |
| Import | import CSV_NAME |
import safeforhall |
| Export | export FILE_NAME |
export closeContactsOfA123 |
Event Commands
| Command | Format | Examples |
|---|---|---|
| Add | add n/EVENT_NAME v/VENUE c/CAPACITY d/DATE t/TIME [r/RESIDENTS] |
add n/Frisbee v/MPSH c/15 d/30/10/2021 t/1500 r/E201 |
| View | view [INDEX] |
view 30 |
| Find | find [PREFIX/KEYWORD]... |
find n/Swim d/28-10-2021 |
| Edit | edit INDEX [FLAG/UPDATED_PARTICULARS]… |
edit 1 n/Football Training l/Field |
| Delete | delete INDEX… |
delete 1 2 3 |
| Include | include INDEX r/RESIDENTS |
include 1 r/A102, E416 |
| Exclude | exclude INDEX r/RESIDENTS |
exclude 1 r/A102, E416 |
| Sort | sort by/FIELD o/ORDER |
sort by/c o/d |
Commons
| Command | Format |
|---|---|
| Help | help |
| Switch | switch |
| Clear | clear |
| Exit | exit |
layout: page title: User Guide —
LibTask is a desktop application for librarians to manage book loans and requests by patrons, optimized for use via a Command Line Interface (CLI) while still having the benefits of a Graphical User Interface (GUI). If you can type fast, AB3 can get your book tracking tasks done faster than traditional GUI apps.
- Table of Contents
1. Introduction
As a school librarian of a large library, you may already have your own desktop library software. However, existing library softwares are GUI-based and slow to work with. If you prefer to work with CLI commands efficiently while still having the benefits of aesthetic displays, then LibTask is designed just for you! LibTask provides you with a well packaged system of commands for managing book loans and book requests by your patrons. Using LibTask, you can quickly process borrowing and returning books, and view different groups of patrons and books to perform tasks such as notifying patrons with overdue books. The system also maintains two independent lists of books and patrons, allowing you to perform queries more efficiently.
2. Quick start
-
Ensure you have Java
11or above installed in your Computer. -
Download the latest
libtask.jarfrom here. -
Copy the file to the folder you want to use as the home folder for your LibTask.
-
Double-click the file to start the app. The GUI similar to the below should appear in a few seconds.
-
Type the command in the command box and press Enter to execute it. e.g. typing
helpand pressing Enter will open the help window.
Some example commands you can try:-
patron list: Lists all the patrons in libTask. -
patron addn/Alice s/S01823283S p/90123212 e/profA@u.nus.edu: Adds a patron namedAliceinto LibTask. -
patron delete3: Deletes the 3rd patron shown in the current patron list. -
book addn/Harry Potter i/12398-12398-239 a/J.K.Rowling t/Thriller t/Magic: Adds a book titledHarry Potter. -
book list: Lists all the books in libTask. -
book delete1: Deletes the 1st book shown in the current book list. -
exit: Exits libTask.
-
-
Refer to the Features below for details of each command.
Features
![]() Notes about the command format:
Notes about the command format:
-
Words in
UPPER_CASEare the parameters to be supplied by the user.
e.g. inadd n/NAME,NAMEis a parameter which can be used asadd n/John Doe. -
Items in square brackets are optional.
e.gn/NAME [t/TAG]can be used asn/John Doe t/friendor asn/John Doe. -
Items with
… after them can be used multiple times including zero times.
e.g.[t/TAG]…can be used ast/friend,t/friend t/familyetc. -
Parameters can be in any order.
e.g. if the command specifiesn/NAME p/PHONE_NUMBER,p/PHONE_NUMBER n/NAMEis also acceptable. -
If a parameter is expected only once in the command but you specified it multiple times, only the last occurrence of the parameter will be taken.
e.g. if you specifyp/12341234 p/56785678, onlyp/56785678will be taken. -
Extraneous parameters for commands that do not take in parameters (such as
help,list,exitandclear) will be ignored.
e.g. if the command specifieshelp 123, it will be interpreted ashelp.
Viewing help : help
Shows a message explaning how to access the help page.
Format: help
Adding a patron: add
Adds a patron to the library database.
Format: patron add n/NAME s/ID p/PHONE e/EMAIL [t/TAG]…
Examples:
patron add n/John s/A02128282A p/93231222 e/e03482@u.nus.edu t/studentpatron add n/Alice s/S01823283S p/90123212 e/profA@u.nus.edu
Listing all patrons : list
Shows a list of all patrons in the database.
Format: patron list
Editing a patron : edit
Edits a patron at a specified index of the displayed patron list.
Format: patron edit INDEX [n/NAME] [s/ID] [p/PHONE] [e/EMAIL] [t/TAG]…
- Edits the patron at the specified
INDEX. The index refers to the index number shown in the displayed patron list. The index must be a positive integer 1, 2, 3, … - At least one of the optional fields must be provided.
- Existing values will be updated to the input values.
- When editing tags, the existing tags of the patron will be removed i.e. adding of tags is not cumulative.
- You can remove all the patron’s tags by typing
t/without specifying any tags after it.
Examples:
-
patron edit 1 n/John Cena p/91959491 e/johncena@u.nus.eduEdits the name, phone number and email address of the 1st patron to beJohn Cena,91959491andjohncena@u.nus.edurespectively. -
patron edit 2 n/Alice t/Professor t/HorrorEdits the name of the 2nd patron to beAliceand changes tags toProfessorandHorror.
Finding a patron by name: find
Finds all patrons with names matching the given keywords in the database.
Format: patron find n/KEYWORD [n/KEYWORD]…
- The search is case-insensitive. e.g.
hanswill matchHans - The order of the keywords does not matter. e.g.
Hans Bowill matchBo Hans - Only the name is searched.
- Only full words will be matched e.g.
Hanwill not matchHans - Patrons matching at least one keyword will be returned (i.e.
ORsearch). e.g.Hans Bowill returnHans Gruber,Bo Yang
Example:
patron find n/alex n/david returns Alex Yeoh, David Li
Deleting a patron : delete
Delete a patron from the system at a specified index of the displayed patron list.
Format: patron delete INDEX
- Deletes the patron at the specified
INDEX. - The index refers to the index number shown in the displayed patron list.
- The index must be a positive integer 1, 2, 3, …
Examples:
-
patron listfollowed bypatron delete 2deletes the 2nd patron in the patron list. -
patron find n/Betsyfollowed bypatron delete 1deletes the 1st person in the results of thefindcommand.
Adding a book: add
Adds a book to LibTask database.
Format: book add n/NAME i/ISBN [a/AUTHOR …] [t/CATEGORY_TAG …]
Examples:
book add n/Harry Potter i/978-7-783828-15-1 a/J.K.Rowling t/Thriller t/Magicbook add n/Heads You Lose i/979-381-26-8943-3 a/Lisa Lutz a/David Hayward
Listing all books : list
List all books in LibTask database.
Format: book list
Editing a book : edit
Edit details of the book at the specified index.
Format: book edit INDEX [n/NAME] [i/ISBN] [a/AUTHOR …] [t/CATEGORY_TAG …]
- Edits the book at the specified
INDEX. The index refers to the index number shown in the displayed book list. The index must be a positive integer 1, 2, 3, … and smaller than or equal to the number of books in the displayed list. - At least one of the optional fields must be provided.
- Existing values will be updated to the input values.
- When editing tags or authors, the existing tags or authors of the book will be removed i.e. adding of tags and authors is not cumulative.
- You can remove all the book’s authors and tags by typing
a/ort/respectively without specifying any tags after it.
Examples:
-
book edit 1 n/Harry Potter: Sorcerer's Stone t/AdventureEdits the name of the 1st book to beHarry Potter: Sorceror's Stoneand edit its category tag to beAdventure. -
book edit 2 i/978-79317-3-542-3 a/Another Rowling t/Edits the ISBN of the 2nd book to be978-79317-3-542-3, changes the author toAnother Rowlingand clears all existing tags.
Deleting a book : delete
Deletes the book at the specified index.
Format: book delete INDEX
- Deletes the book at the specified
INDEX. - The index refers to the index number shown in the displayed book list.
- The index must be a positive integer 1, 2, 3, … and smaller than or equal to the number of books in the displayed list.
Examples:
-
book listfollowed bybook delete 2deletes the 2nd book from LibTask’s database.
Borrowing a book : borrow
Establishes a relationship that patron at index INDEX1 borrows a book at index INDEX2.
Format: borrow INDEX1 INDEX2
-
INDEX1refers to the index number shown in the displayed patron list. -
INDEX2refers to the index number shown in the displayed book list. -
INDEX1must be a positive integer 1, 2, 3, … and smaller than or equal to the number of patrons in the displayed list. -
INDEX2must be a positive integer 1, 2, 3, … and smaller than or equal to the number of books in the displayed list. - The book at
INDEX2must not be already borrowed.
Examples:
-
patron listandbook listfollowed byborrow 2 3establishes a relationship that the 2nd patron borrows the 3rd book.
Returning a book : return
Depending on the exact command, return all books borrowed by a patron at the specified index, or return a book at the specified index.
Format: return PREFIX/INDEX
-
PREFIXmust be eitherpfor patrons orbfor books. - If
PREFIXisp,INDEXrefers to the index number shown in the displayed patron list. - If
PREFIXisb,INDEXrefers to the index number shown in the displayed book list. -
INDEXmust be a positive integer 1, 2, 3, … and smaller than or equal to the number of patrons or books in the displayed list. - If the book at index
INDEXis not borrowed, or if the patron at indexINDEXdoes not borrow any books, nothing happens.
Examples:
-
patron listfollowed byreturn p/3will return all books borrowed by the 3rd patron, if any. -
book listfollowed byreturn b/2will return the 2nd book, if it is borrowed.
Requesting a book : request
Establishes a relationship that patron at index INDEX1 is requesting to be notified when the book at index INDEX2 is available.
Format: request INDEX1 INDEX2
-
INDEX1must be a positive integer 1, 2, 3, … and smaller than or equal to the number of patrons in the displayed list. -
INDEX2must be a positive integer 1, 2, 3, … and smaller than or equal to the number of books in the displayed list. - If the book at index
INDEX2is currently available, a message will be displayed.
Examples:
-
patron listandbook listfollowed byrequest 1 2keeps a record that the 1st patron would like to be notified when the 2nd book is available.
Clearing all entries : clear
Clears all entries from the address book.
Format: clear
Exiting the program : exit
Exits the program.
Format: exit
Saving the data
AddressBook data are saved in the hard disk automatically after any command that changes the data. There is no need to save manually.
Editing the data file
AddressBook data are saved as a JSON file [JAR file location]/data/addressbook.json. Advanced users are welcome to update data directly by editing that data file.
Archiving data files [coming in v2.0]
Details coming soon …
FAQ
Q: How does this app help current librarians?
A: The app helps librarians manage the statuses of books borrowed and borrowers.
Command summary
Category: Patron Commands
| Function | Format Of Command |
|---|---|
| Add a new patron | patron add n/NAME s/ID p/PHONE e/EMAIL [t/TAG]… |
| List all patrons | patron list |
| Edit a patron | patron edit INDEX [n/NAME] [s/ID] [p/PHONE] [e/EMAIL] [t/TAG]… |
| Find a patron | patron find n/KEYWORD [n/KEYWORD]… |
| Delete a patron | patron delete INDEX |
Category: Book Commands
| Function | Format Of Command |
|---|---|
| Add a book | book add n/NAME i/ISBN [a/AUTHOR …] [t/CATEGORY_TAG …] |
| List all books | book list |
| Edit a book | book edit INDEX [n/NAME] [i/ISBN] [a/AUTHOR …] [t/CATEGORY_TAG …] |
| Delete a book | book delete INDEX |
| Borrow a book | borrow INDEX1 INDEX2 |
| Return a book | return PREFIX/INDEX |
| Request a book | request INDEX1 INDEX2 |
Category: General Commands
| Function | Format Of Command |
|---|---|
| Clear all entries | clear |
| Exit the program | exit |
| Show message to help page | help |
| Navigating the different patrons/books | Clicking the :arrow_up and :arrow_down arrows on :keyboard |